
TL;DR

Get audio and creator gear delivered free with Prime
- Fast, free delivery on millions of items
- Prime Video, Amazon Music and more included
- Member-only deals all year
To light a green screen evenly without hotspots, light the background separately from your subject and spread soft, matching light across the full area the camera sees. Keep the screen smooth and matte, give the subject room to stand clear of shadows and green spill, and check the camera image at the center, corners, and edges without clipping the green channel.
A green screen can look perfectly smooth to your eyes and still turn patchy on camera. One bright circle, a soft shadow, or a wrinkle catching the light can leave green fringes around your hair or a hole in your jacket after keying.
Lighting a green screen evenly without hotspots means giving the camera a consistent green color and exposure across the visible background. You’ll learn how to place and soften background lights, separate your subject, and check the frame so a modest home setup can produce a cleaner key without expensive studio gear.
Use separate lights for the green screen and the subject so you can control background exposure and subject lighting independently.
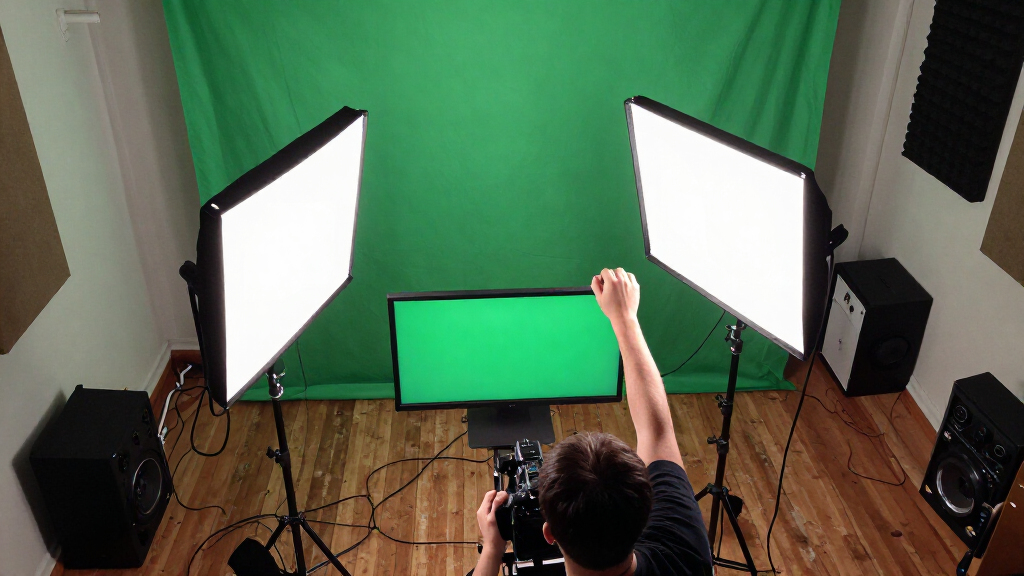
For a small screen, start with two matching, diffused lights on opposite sides, aimed to overlap across the backdrop.
Give the subject several feet of separation when the room allows it to reduce screen shadows and green spill.
Smooth fabric and avoid glossy surfaces before fine-tuning your fixtures.
Check a camera frame at the center, corners, and edges, and keep the green channel from clipping.
Light Your Green Screen Evenly, Without Hotspots
Consistent color and exposure across the camera frame make a cleaner key. Separate screen and subject lighting, then judge the result through the camera.
Build Even Coverage
For a small screen, start with two matching, diffused lights and adjust their overlap by checking the camera image.
Tension fabric and avoid shiny surfaces that create uneven shade or reflections.
Put one on each side and aim them across the screen so their beams overlap.
Keep the subject several feet forward when space allows, reducing screen shadows and green spill.
Check What the Camera Sees
A room can look balanced while the recorded screen has a bright center or dark edges.
- Compare the center, corners, and edges of the visible background.
- Adjust light position, angle, diffusion, or output one fixture at a time.
- Keep detail in the green channel; avoid clipped highlights and deep shadows.
- Inspect a test frame and correct lighting before relying on keying controls.
What Creates a Difficult Key
- One bare light aimed at the center
- Wrinkles, glossy patches, or reflections
- Mismatched background light color
- Subject shadows on the backdrop
- Soft, overlapping background light
- Smooth, matte fabric
- Consistent fixture color and exposure
- Space between subject and screen
Why Even Green Makes Your Key Look Cleaner
An even green screen makes keying easier by giving the software a consistent color to remove. The camera sees similar green across the background, so the keyer can select that color without also eating into your subject or leaving green edges behind. The aim is consistent color and exposure across the frame, not simply making the screen as bright as possible.
Imagine you’re recording a presenter in front of a fabric backdrop. The middle is bright, but the lower corner sits in shadow and a wrinkle catches a strip of light. The keyer has to handle several different greens at once; it may leave a dark patch or nibble at a sleeve while trying to remove the background. A more even starting image usually needs less correction.
Hotspots are areas that appear much brighter than their surroundings, often because a small or direct light points at one part of the screen. Shadows and reflections create the opposite problem: patches of darker, tinted, or inconsistent color. These variations can leave green fringes or holes when software tries to separate the subject.
Don’t chase a universal brightness number. Your screen, camera, lens, room, and keying tool all affect the result. Expose the green evenly, keep detail in it, and check the image your camera records. The room can look bright and balanced while the camera quietly reveals a pale center and dark edges.
Popular right now

TCL 65-Inch QM6K QLED Mini-LED 4K HDR Smart Google TV, 144Hz

KitchenAid Classic Series 4.5-Quart Tilt-Head Stand Mixer, Onyx Black

Ninja Foodi 6-in-1 DualZone Air Fryer, 8 qt, Grey (DZ201)
As an affiliate, we earn on qualifying purchases.
Use Two Soft Lights to Cover a Small Screen
Two matching, diffused lights placed to the left and right of a small green screen are a practical starting point for even coverage. Aim each light across the background so their beams overlap, and keep the fixtures at similar distances and output levels. This helps avoid a bright central spot from one lamp pointed straight at the middle.
For example, if you’re filming waist-up in a spare room, put one soft source beside each edge of the camera frame, aimed diagonally across the backdrop. Start with both lights at the same output. Look at the image and adjust one fixture at a time; if the left side is bright, try moving or angling that light before raising every light in the room.
Soft, broad light blends more gently across the fabric than a bare, small lamp. A diffusion layer or a bounce surface can spread the beam, though it may reduce output. That tradeoff is usually manageable for a small setup: you can move a light closer, increase its output, or accept a wider aperture if the rest of your exposure still works.
Larger screens may need broader sources or additional fixtures, with their coverage overlapping across the area in frame. A single bright fixture often gives the center too much attention and leaves the edges behind. Let the camera image guide your layout; two lights are a starting point, not a rule that every backdrop must obey.
Separate Your Subject Before Shadows and Spill Spread
Put as much space between your subject and the green screen as your room and framing allow. Separation makes it easier to stop the subject’s shadow from falling on the background and reduces green light reflecting onto skin, hair, and clothing. Several feet is a useful starting point when the room allows it, though your framing and available space set the practical limit.
Say you’re filming a person against a backdrop in a small office. At arm’s length from the screen, their head may cast a shadow directly behind them, and the green can tint the edge of their dark hair. Move them a few feet forward, then shift the background lights so they still cover the fabric without pointing straight at the person. Those simple adjustments can make the outline easier to key.
Light the subject independently from the screen. Your face light can be placed and adjusted to flatter your skin without changing the background exposure. If the subject lights hit the green screen, though, they may create uneven bright patches; if the background lights spill onto the subject, green reflections may appear on clothing or skin.
Use careful angles, flags, or negative fill to keep light where it belongs. A dark jacket can reveal green spill along the shoulder, while pale hair can show a colored fringe more clearly than a dark background. Check the subject’s outline in the camera feed after adjusting separation. If a shadow remains, change the light direction or subject position before asking software to clean it up.
Smooth Wrinkles and Remove Anything That Reflects
A smooth, matte screen gives you a more predictable surface to light than crumpled or shiny material. Wrinkles make tiny ridges and valleys: one fold catches light while its neighbor falls into shadow. Glossy fabric or paint can bounce a bright reflection toward the camera, creating a hotspot even when the light seems well placed.
If you’re using a fabric backdrop, stretch or tension it evenly before you fine-tune your lights. A quick camera check may reveal a crease near the top that you barely noticed while setting up. If the cloth sags when someone steps behind it, add support or move the subject so the fabric stays smooth throughout the take.
Matte surfaces help because they scatter light more evenly than shiny ones. The difference shows up in practical terms: a satin patch may flare as you shift the light or camera, while matte fabric tends to keep its appearance steadier. If your screen has a stubborn reflective mark, changing the angle of the light can help, but fix the surface itself when you can.
For instance, a creator who tapes a green sheet loosely to a wall may spend twenty minutes adjusting lights around a long crease. Pulling the sheet taut first can solve the problem faster than adding another fixture. Fix the surface before the lighting becomes a useful habit: smooth the backdrop, frame the shot, then judge what the camera still sees.
Check the Camera Image at the Center, Edges, and Corners
The camera image is the best way to judge whether the screen is evenly lit. Use a waveform, false color, histogram, or sampled frame values if your camera or software provides them, and compare the visible background at the center, corners, and edges. A view across the whole frame catches gradients that a quick glance at the middle can miss.
Here’s a simple scenario: a creator sees an even green in the room, but the recorded frame has a pale circle behind their head and dark lower corners. They pause before filming, compare those areas on a waveform or sample view, then angle the background fixtures outward and add diffusion. A second frame tells them whether that changed the coverage, rather than relying on memory of how the room looked.
Lighting a green screen evenly without hotspots also means keeping the green channel from clipping. If you push exposure too high, bright areas may lose color detail and become harder to remove cleanly. Exact exposure levels vary with your camera and keying software, so follow their guidance when available and look for consistency instead of chasing a magic number.
Take a test frame after the screen, lights, subject, and camera are in their final positions. Review it through the same keying workflow you’ll use later, since small patches can become obvious once the keyer selects green. Correct lighting problems first; use key controls to handle modest remaining differences, not severe shadows or clipped hotspots.
Follow This Setup Order Before You Record
Set up the screen, background lights, subject, and camera in a deliberate order so each adjustment has a clear purpose. Start by smoothing the backdrop and framing the shot; then create space for the subject, place matching background lights, and check the finished image. This keeps you from raising output to compensate for a wrinkle or moving the person after you’ve balanced the whole frame.
- Smooth and tension the screen, then frame the shot you plan to record.
- Move the subject forward as far as the room and framing allow.
- Place two matching, diffused background lights, one on each side, and aim them so their coverage overlaps.
- Light the subject separately, watching for screen shadows or background light spilling onto them.
- Compare the camera image at the center, corners, and edges; adjust angle, position, diffusion, or output.
- Record a test frame and check the key before filming a full take.
Think of a small apartment setup: you might have only two LED panels, a fabric screen, and one subject light. That can be enough if the screen is smooth, the background panels cover it evenly, and you check the result before rolling. If a corner stays dim, move or broaden a source first; adding a third light only makes sense if it solves the remaining coverage problem.
Keep notes if you return to the same set. A phone photo of the fixture positions or a quick record of their output settings can save setup time next week. Rooms change when daylight shifts or practical lamps come on, so use the camera image to confirm the look each time.
Avoid the Fixes That Make Keying Harder
Don’t point one bare light at the center and assume the whole screen is covered. That approach often creates a bright middle with darker edges, leaving the keyer to cope with inconsistent green across one frame. Two well-placed, diffused sources usually give a small screen a more useful starting point, though larger backdrops may need broader coverage or more fixtures.
Mixed-color lights can create another headache. Daylight from a window, a warm household bulb, and cool background LEDs may tint different parts of the screen differently. For example, one side of a backdrop near a window can read cooler than the other side lit by a warm lamp. Turn off uncontrolled room lights or match your sources as closely as practical.
More brightness is not the same as better coverage. If the green clips, the camera can lose useful color detail; if a shadow crosses the fabric, lifting every light may just make the rest of the screen too bright. A software key may handle small variations, but strong shadows and clipped areas often leave artifacts that take time to repair.
When a test key looks rough, identify the cause before changing several settings at once. Check for wrinkles, direct reflections, spill, a shadow, or an uneven gradient. One creator may fix a bright patch by turning a light away from a shiny fold, while another may need more subject separation. The right fix depends on what the frame shows.
Frequently Asked Questions
How far should the subject stand from a green screen?
Move the subject as far forward as the room and framing allow; several feet is a useful starting point. More space can reduce shadows on the screen and green spill on the subject. Check the outline in the camera image, since the best distance depends on your room and lens.
How many lights do I need to light a green screen?
For a small screen, start with two matching, diffused background lights, one on each side. Larger screens or uneven spaces may need broader sources or additional fixtures. Use the camera image to decide; a fixed count won’t suit every backdrop.
Should I use soft or hard lights on a green screen?
Soft, diffused light is generally easier to blend across a screen and is less likely to reveal sharp shadows or small surface flaws. Hard light can work with careful placement, but it tends to show wrinkles and uneven areas. If a bare fixture creates a bright spot, try diffusion or a broader source.
How can I tell if my green screen is evenly lit?
Inspect a frame from your camera across the center, corners, and edges, using a waveform, false color, histogram, or sampled image values when available. A screen can look even in the room but show a gradient on camera. A test key can reveal small patches before you record a full take.
How bright should a green screen be?
There is no single brightness target that fits every camera and keying setup. Aim for consistent exposure across the visible screen and avoid clipping the green channel. Follow your camera or software guidance when available, and judge the recorded image.
Can keying software fix green screen hotspots?
Keying software can often handle modest variation, but strong shadows, clipped highlights, and large exposure differences can leave artifacts. Adjust the screen, light angles, or subject position on set first. Software works best when the camera already sees a fairly consistent background.
Conclusion
Give your camera a smooth, matte screen, soft overlapping coverage, and enough separation between the background and your subject. Then judge the result in a test frame, checking the edges as carefully as the center. Even color beats extra brightness, and a little attention before recording can save a long session of fighting green fringes afterward.
When your next key looks rough, pause on the frame and find the bright patch, shadow, or reflection that caused it. Fix that on set, and let the software finish the job.