TL;DR
Monitor hiss at idle is the inherent self-noise of active speakers, caused by electronics and thermal noise. Proper troubleshooting reveals whether it’s normal or a sign of a problem. Minimizing hiss improves clarity and confidence in your studio setup.
Ever sit in a quiet room and notice that faint ‘shhh’ coming from your monitors? That’s not a defect; it’s the noise floor—an unavoidable byproduct of electronic components.
If you’re tired of guessing whether that hiss is normal or a sign of trouble, you’re in the right place. Understanding what causes monitor hiss at idle, how to measure it, and what you can do about it makes your studio quieter and your mixes clearer.
Always perform a disconnect test to determine if hiss is from the monitor or upstream gear.
Proper gain staging—source at a healthy level, modest monitor gain—keeps hiss at bay.
Inherent self-noise varies but is generally below the ambient room noise in a quiet environment.
Use balanced cables and keep power cables away from audio wiring to reduce interference.
Modern tech like Class D amps and onboard DSP can aid but don’t replace good wiring and setup practices.
Monitor Hiss
at Idle
That faint “shhh” in a quiet room isn’t a defect — it’s the noise floor: thermal noise, input-stage electronics and DAC conversion inside every active speaker. Learn to tell normal self-noise from a real fault — and push it below audibility.
What’s really going on when monitors hiss at idle
Every active speaker produces self-noise. It isn’t a defect — it’s a fundamental limit set by physics, and it can be minimized, never zeroed. Knowing that keeps you from replacing good gear prematurely.
Johnson–Nyquist noise
Electrons agitate in every resistor, generating broadband noise. It’s inherent to analog circuitry — the price of admission for active electronics.
Input-stage electronics
The amp’s input stage sets the residual noise floor. Hiss that stays constant as you turn the gain down reveals the amplifier’s own floor; hiss that scales with the knob enters before the gain stage.
DAC & DSP conversion
In DSP-equipped monitors, digital-to-analog conversion and digital gain boosts add their own noise contribution — sometimes raising the floor unexpectedly.
A quality monitor’s self-noise of 20–30 dBA at the listening position is often below the ambient room noise — virtually inaudible in most environments. But at 0.5–1.5 m in a quiet, treated room at night, even <20 dBA at the tweeter can be heard. High-sensitivity compression-driver tweeters make any noise voltage more audible.
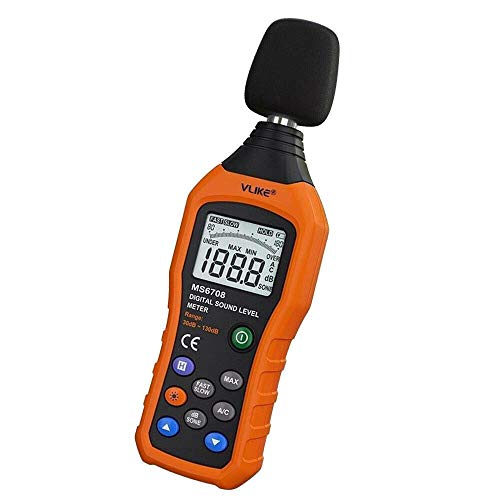
VLIKE LCD Digital Audio Decibel Meter Sound Level Meter Noise Level Meter Sound Monitor dB Meter Noise Measurement Measuring 30 dB to 130 dB A/C Mode (Batteries Not Include)
The sound level meter is an instrument used to real-time measure the sound level,such as sound level around…
As an affiliate, we earn on qualifying purchases.
As an affiliate, we earn on qualifying purchases.
Hiss vs. hum vs. buzz — why it matters
Not all noise is created equal. Each species points to a different cause and a different fix — identifying yours correctly saves time, money, and unnecessary upgrades.
| Noise Type | Sound Signature | Likely Cause | Fixable? | First Move |
|---|---|---|---|---|
| HissBroadband | A gentle, constant “shhh” across all frequencies | Thermal noise, input-stage electronics, DAC self-noise; amplified by poor gain staging | ~ Inherent | Run the disconnect test; fix gain staging — minimize, don’t chase zero |
| Hum50/60 Hz | A steady low tone, often with harmonics | Ground loops, poor power supplies, mains wiring issues | ✓ Fixable | Ground-loop isolator or DI box; check grounding and outlet circuits |
| Buzz / WhineRF & digital | Harsh buzz, coil whine, or chirping digital artifacts | RF from phones / Wi-Fi, USB ground noise, switching power supplies | ✓ Fixable | Move wireless gear, shield or reroute cables, go balanced XLR/TRS |
Safety note: Never lift the safety earth to kill a ground loop — use an isolation transformer or DI box instead.

Birvemce 2 Pack Premium TRS Cable 10FT, 1/4 Inch TRS Cable- Noise Free and Long-Lasting Stereo 1/4 Audio Cable, Balanced Interconnect Line for Electric Guitar, Mixer, Studio Monitor, Right Angle
【PROFESSIONAL STEREO PLUG, HIGHER AUDIO QUALITY】Compared with TS Mono guitar cable, this 1/4 TRS Cable support Stereo signal,…
As an affiliate, we earn on qualifying purchases.
As an affiliate, we earn on qualifying purchases.
Is your hiss normal — or a sign of trouble?
One simple procedure separates intrinsic self-noise from upstream problems. It’s the difference between hours of guesswork and a targeted fix.
Disconnect everything
Pull all inputs from the monitor — cables, interfaces, controllers. Nothing attached.
Power on the monitor
Let it idle with no signal connected, gain where you normally keep it.
Listen at your position
Sit where you mix. Note the hiss level against the silence of the room.
Compare & conclude
Unchanged hiss = the monitor’s own floor. Hiss gone = the noise lives upstream.
It’s self-noise — a design limit
The monitor’s own electronics, by design. Usually not fixable except by service or a quieter design. If it’s 20–30 dBA at your seat, it’s likely below ambient — leave it alone.
The noise is upstream — go hunting
Interface DAC, cables, computer ground noise, or a ground loop. Swap cables, try balanced connections, test another outlet or circuit, and check for DSP digital-gain boosts.
monitor speaker self-noise reduction
As an affiliate, we earn on qualifying purchases.
As an affiliate, we earn on qualifying purchases.
How loud is the noise floor, really?
Putting self-noise on a dBA scale against everyday reference points shows why most monitor hiss is a perception problem, not an equipment problem.
audio interface with low noise floor
As an affiliate, we earn on qualifying purchases.
As an affiliate, we earn on qualifying purchases.
Six ways to push the noise floor down
Proper gain staging does the heavy lifting; wiring and power hygiene handle the rest. Measure first so you’re making real improvements, not chasing phantom issues.
Fix your gain staging
Run the source output at a healthy level and keep monitor gain modest. Low source + high speaker gain amplifies the monitor’s own noise floor — the most common self-inflicted hiss.
Go balanced XLR / TRS
Balanced connections reject interference, especially over longer runs. Unbalanced RCA and 3.5 mm leads pick up noise near computers.
Separate power from audio
Keep power cables away from audio wiring to cut electromagnetic coupling. A dedicated outlet or power conditioner stabilizes a noisy mains supply.
Banish wireless interference
Move phones, Wi-Fi routers and wireless gear away from speaker wiring. RF signals couple into cables and add hiss or digital whine.
Kill ground loops safely
Hum means grounding trouble. Use a ground-loop isolator or DI box — never remove the safety earth. Try another outlet or circuit to rule out mains noise and dimmers.
Measure the floor with REW
A USB measurement mic plus free tools like REW shows whether your setup is unusually noisy — data beats guessing, and prevents pointless hardware upgrades.
New tech is redrawing the noise map
Quieter amplifiers and smarter monitors change where noise comes from — but they don’t replace good wiring and gain discipline.
Class D done right
Modern Hypex, Purifi and ICEpower modules deliver dramatically lower distortion and thermal noise — the amplifier is often quieter than the analog input stage feeding it.
Noise moves inside
DSP-equipped monitors put DACs and digital crossovers inside the speaker, shifting noise sources — and sometimes revealing digital gain boosts that raise the floor.
Awareness cuts both ways
Room-calibration ecosystems like Sonarworks fine-tune your sound but surface hiss complaints when calibration applies digital boosts. Gain structure matters more than ever.
From hiss to hush, in order
What’s Really Going On When Your Monitors Hiss at Idle
The first step is knowing that some hiss is completely normal. Every active speaker produces a certain level of self-noise—thanks to thermal noise in resistors, the input stage electronics, and digital-to-analog conversions.
This noise isn’t a defect but a fundamental limit set by physics. For example, a decent studio monitor might have a self-noise level of around 20-30 dBA at the listening position—often quieter than a whisper in a library.
Understanding this helps you set realistic expectations: a certain amount of hiss is inevitable with active monitors due to the electronic processes involved. Recognizing what’s normal allows you to avoid unnecessary troubleshooting or replacing gear prematurely. However, if the hiss is louder than typical levels or varies significantly with volume, it could indicate issues like grounding problems, faulty components, or interference, which merit further investigation. The tradeoff here is between the inherent self-noise that’s unavoidable and additional noise introduced by poor setup or malfunction—knowing the difference guides your troubleshooting focus effectively.
How to Test if Your Monitor Hiss Is Normal or a Sign of a Problem
Here’s a quick, practical test you can do:
- Disconnect all inputs from your monitor—cables, interfaces, everything.
- Power on the monitor and listen at the usual listening position.
- If the hiss remains at the same level, it’s probably the monitor’s own noise floor—by design and usually unfixable.
- If the hiss drops significantly, the noise was coming from your source, cables, or ground loop issues.
This simple step saves you hours of guesswork. It’s often the difference between a normal self-noise and a problem that needs fixing. Knowing whether your hiss is intrinsic or caused by external factors helps you decide whether to focus on upgrading cables, improving grounding, or replacing faulty gear. The implication here is that isolating the source can prevent unnecessary equipment changes and help you target actual issues efficiently.
Why Your Gain Settings Make or Break the Noise Floor
The way you set your gain can turn a quiet hiss into a loud annoyance—or hide it altogether. If your source output is low and your monitor gain is high, you amplify the monitor’s own noise floor.
Conversely, setting the source at a healthy level and using modest monitor gain keeps the hiss as low as possible. Think of it like turning up your stereo—you want the volume knob to be at a sensible spot, not maxed out. This balance is crucial because excessive gain not only amplifies the self-noise but can also introduce distortion or clipping, degrading overall sound quality. Proper gain staging minimizes these tradeoffs by ensuring each component operates within its optimal range, reducing unnecessary noise amplification. The key takeaway is that careful gain adjustment directly influences the clarity of your listening environment and helps prevent masking or misinterpreting subtle sounds in your mix.
Distinguishing Between Hiss, Hum, and Buzz — Why It Matters
Not all noise is created equal. Hiss is broadband, like a gentle shushing sound—thermal and electronic noise. Hum is a steady 50 or 60 Hz tone, often caused by grounding issues. Buzz or digital whine is usually RF interference or switching power supply noise.
Knowing the difference is vital because each type of noise points to different causes and solutions. For example, a hum indicates a grounding problem that can often be fixed with a lift or ground loop isolator, whereas buzz might be due to nearby RF interference, which requires shielding or repositioning cables. Hiss, on the other hand, is typically an unavoidable aspect of active electronics, but excessive or fluctuating hiss could signal faulty components or poor shielding. Recognizing these distinctions helps you target your troubleshooting efforts more accurately, saving time and avoiding unnecessary expenses. The implication is that understanding the nature of the noise informs better decisions about upgrades, wiring, and room treatment, leading to a quieter, more accurate monitoring environment.
Practical Tips to Minimize Monitor Hiss in Your Studio
- Use balanced XLR or TRS cables for all connections—especially over longer runs. They reject interference better, reducing the chance of external noise coupling into your system.
- Keep power cables away from audio cables to reduce electromagnetic interference, which can add to the noise floor and make hiss more noticeable.
- Use a dedicated power outlet or power conditioner to stabilize your power supply. Fluctuations and noise in your mains can manifest as hiss or other interference in your monitors.
- Turn down your source volume and set your monitor gain to a moderate level. Proper gain staging ensures that the electronics operate within their optimal range, minimizing unnecessary noise amplification.
- Move your wireless gear, phones, and Wi-Fi routers away from your audio wiring. These devices emit RF signals that can couple into cables and increase hiss or introduce digital noise.
- Measure your noise floor with a USB measurement mic and free tools like REW to see if your setup is unusually noisy. This data-driven approach helps identify whether external factors or internal components are contributing to excess hiss, guiding targeted improvements. Recognizing when your noise floor exceeds typical levels can prevent misdiagnosis and unnecessary hardware upgrades, saving you time and money.
For example, a home studio with a computer, Wi-Fi, and budget monitors might notice more hiss at night when everything’s quiet. Simple cable rerouting and power management can cut that hiss in half, but understanding your actual noise floor ensures you’re making meaningful improvements rather than chasing phantom issues.
What New Tech Is Changing How Quiet Monitors Can Be
Modern amplifiers like Class D (Hypex, Purifi) are quieter than older designs, thanks to lower distortion and thermal noise. DSP-equipped monitors, which include digital crossovers and onboard DACs, shift where noise can come from—sometimes revealing digital gain boosts that raise the noise floor.
Room calibration systems like Sonarworks help you fine-tune your sound, but they can also make you more aware of hiss that was previously hidden. Many builders now use measurement tools to compare their monitors’ self-noise directly—making noise floor management more precise.
While these advancements help, remember: room treatment, proper gain structure, and good cables are still your best friends for achieving a near-silent listening environment. These technological improvements reduce the inherent self-noise of components, but they can also reveal subtle hisses or digital artifacts that were previously masked. The tradeoff is that as monitors become cleaner, your awareness of minute noises increases, emphasizing the importance of a well-optimized setup for quiet operation.
Your Most Common Questions About Monitor Hiss (Answered!)
Is idle hiss normal, or is my monitor defective? Some hiss is normal—especially at close listening distances. It’s usually a sign of good electronics, not a sign of fault.
How much hiss is too much? If you can hear it from your typical listening position in a quiet room, it’s worth investigating. A faint hiss only noticeable with your ear at the tweeter is typical, but loud or fluctuating hiss could indicate issues with grounding, shielding, or faulty components.
Why does one speaker hiss more than the other? Imbalance often points to a bad cable, connection, or asymmetric interference. Swap cables or check connections first. Persistent imbalance might also suggest internal component issues or damage.
Will upgrading my interface or DAC fix the hiss? Only if the noise originates upstream. The monitor’s own self-noise is unaffected by your interface, but reducing upstream noise can improve overall clarity.
What does it mean if the hiss scales when I turn the volume knob? It indicates the hiss is happening before the gain stage—likely from the source or cables. Constant hiss with volume suggests amplifier self-noise. Understanding where the noise scales helps identify whether the problem is in the source, cables, or the monitor itself.
Conclusion
Understanding your monitor’s noise floor transforms the way you listen and troubleshoot. A quiet studio isn’t just about better gear—it’s about smart setup and realistic expectations.
Next time you hear that faint hiss, remember: it’s often normal, and with a few tweaks, you can make it less noticeable—leaving you with cleaner, clearer sound that’s all about your music, not the electronics.