TL;DR

Get audio and creator gear delivered free with Prime
- Fast, free delivery on millions of items
- Prime Video, Amazon Music and more included
- Member-only deals all year
Using an SPL meter to calibrate your studio monitors sets a fixed, accurate reference level. It improves mix consistency and protects your hearing, especially when combined with proper test signals and placement. This simple step is key for professional-grade sound work.
Always calibrate each monitor channel separately to 83 dB SPL using pink noise.
Position your SPL meter at ear height, aiming toward the ceiling to avoid directivity errors.
Use C-weighted, slow response settings for accurate SPL readings, avoiding fast or A-weighted modes.
Recheck your calibration after moving speakers or furniture to keep levels consistent.
Fixed, calibrated monitor levels improve mix translation, protect your hearing, and simplify loudness targets.
Calibrating Monitor Levels With an SPL Meter
A fixed, measured listening level makes mix decisions repeatable. Pink noise, correct meter placement and one-speaker-at-a-time adjustment give your studio a dependable reference—improving translation while reducing fatigue and accidental overexposure.
Per speaker · C-weighted · slow response
Give your ears a fixed point of reference.
Human hearing changes with playback level. Without a repeatable monitor setting, tonal balance, bass weight and apparent detail all shift—so yesterday’s mix decisions may not survive today’s listening level.
Mixes travel better
A consistent SPL reduces level-driven EQ errors. Judgements made in your room become more portable across headphones, cars, phones and other studios.
Sessions start aligned
A marked monitor-gain position removes guesswork. Fixed gain also helps DAW loudness readings correlate with the loudness you actually perceive.
Level stays intentional
Calibration discourages accidental volume creep. Work at a moderate reference, take breaks and reserve louder checks for brief, deliberate moments.
Calibrate each monitor channel separately. The aim is not “maximum accuracy at maximum loudness”—it is a stable, appropriate reference that you can reproduce every day.
From pink noise to a locked reference in minutes.
Turn the room quiet, use a clean signal path and avoid changing your interface or controller gain after calibration.
Load pink noise
In your DAW, play −20 dBFS RMS pink noise. A band-limited 500 Hz–2 kHz signal can reduce room-mode influence.
Place the meter
Put it at the listening position, at ear height. Aim the microphone upward at 90° and keep placement identical for both channels.
Set one speaker
Mute the opposite channel. Adjust monitor gain until the meter reaches 83 dB SPL, or your chosen small-room target.
Repeat and lock
Calibrate the other speaker and match within ±0.25–0.5 dB. Mark the gain position and save the test session.
83 dB is a reference, not a commandment.
Room size, listening distance and acoustics affect the sensible working level. Nearfield systems in compact or untreated rooms often feel more balanced below the full studio reference.
Common calibration targets
Values are dB SPL targets. Use the lower end when 83 dB feels excessive at your nearfield listening distance, then keep that chosen reference consistent.
Budget meters can do the core job.
A basic dedicated SPL meter is usually sufficient for home-studio alignment. Certified Class 1 or Class 2 tools earn their cost when precision, documentation and traceable calibration matter.
| Feature | Budget meter | Class 1 / 2 meter |
|---|---|---|
| Typical price | $50–$150 | $300–$1,000+ |
| Typical precision | ~ ±1–2 dB | ✓ As tight as ±0.1 dB |
| Operation | Simple display; may need correction | Advanced settings and detailed readings |
| Calibration record | ~ Usually limited | ✓ Certified and traceable |
| Best fit | Home studios and quick checks | Mastering, facilities and critical work |
Examples include RadioShack-style meters and the Galaxy CM-140 at the budget end, with NTi or Larson-class instruments used for higher-precision measurement.
Five shortcuts that break the measurement.
Calibration is simple, but small procedural errors can produce a confidently wrong result.
A-weighting or fast response
A-weighting under-represents low frequencies; fast response makes pink-noise readings unstable.
Fix · C-weighted + slowUsing music as the signal
Changing dynamics, transients and spectral balance make music an inconsistent calibration source.
Fix · Use calibrated pink noisePlaying both speakers
Summation can add roughly 3 dB, while phase interaction introduces comb-filtering errors.
Fix · Mute every other channelMeasuring away from your head
SPL varies significantly with position, particularly in small rooms with strong reflections and modes.
Fix · Ear height at mix positionConfusing RMS with peaks
The SPL meter’s slow reading is not equivalent to transient peak values displayed in your DAW.
Fix · Verify test-signal specificationTreating calibration as permanent
Speaker movement, new furniture and acoustic changes can alter the level at your listening position.
Fix · Recheck after room changesOne measured chain, better decisions downstream.
Recall the marked monitor-gain position, confirm routing and resist changing level to make the mix feel more exciting.
Repeat the measurement after moving monitors, changing furniture, adding treatment or altering the listening position.
Why Calibrating Your Monitors Matters More Than You Think
When you calibrate your monitors to a consistent SPL—like 83 dB SPL per speaker—you create a stable listening environment. This ensures your mix decisions aren’t skewed by level shifts or room anomalies. Think of it like setting your camera to a fixed ISO; everything else becomes more predictable. Human hearing is not flat—loudness and perceived frequency shift with volume, so a fixed level helps you hear your mix as intended, every time.
For example, if you mix at 70 dB instead of 83, your bass can sound less prominent, leading you to boost it. When you play that same mix on a different system or at a different volume, it might sound muddy or thin. Calibrating to a standard level like 83 dB creates a common ground—your mix translates better across devices and rooms.
Beyond consistency, proper calibration also protects your hearing. Listening at a calibrated, moderate level reduces the risk of hearing fatigue or damage over time. It also encourages a more disciplined listening environment, where you rely on measured levels rather than subjective guesswork, leading to more professional results.
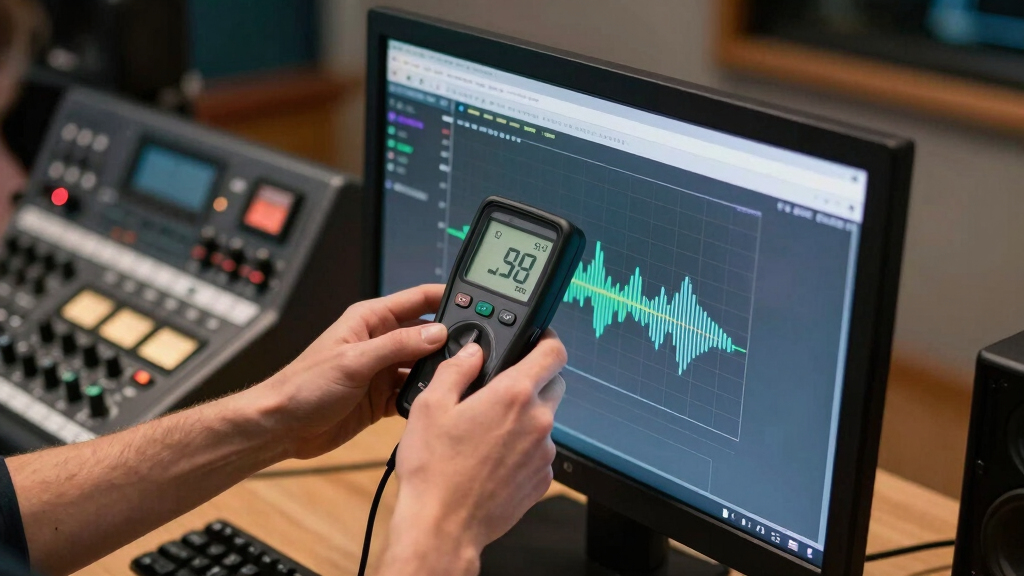
professional SPL meter for studio calibration
As an affiliate, we earn on qualifying purchases.
As an affiliate, we earn on qualifying purchases.
How to Set Your Monitor Levels Using an SPL Meter in 4 Easy Steps
- Generate a pink noise test signal. In your DAW, set a -20 dBFS RMS pink noise track. This is your calibration tone—consistent, flat, and easy to measure. Pink noise is preferred because it distributes energy evenly across the frequency spectrum, mimicking many real-world sounds and providing a reliable basis for calibration.
- Position your SPL meter correctly. Place it at your listening position, ear height, pointing toward the ceiling (90°). This positioning ensures the SPL reading reflects what your ears perceive, minimizing directivity errors. Proper placement is crucial because even small differences in position can lead to significant measurement discrepancies, affecting calibration accuracy.
- Adjust your monitor gain. Play pink noise through one speaker at a time. Watch your SPL meter and turn the monitor gain until it hits exactly 83 dB SPL (or your chosen level). This process ensures each monitor produces a consistent sound pressure level, which is vital for making accurate mix decisions. Remember, the goal is to set a reference level that your ears and equipment can reliably reproduce across different sessions and environments.
- Repeat for both channels. Mute one speaker while calibrating the other. Match both within ±0.25 dB for a balanced stereo image. Achieving this tight tolerance ensures your stereo field is accurate, preventing phase issues or imbalance that could mislead your mixing decisions. Properly calibrated monitors also help your mixes translate better to other systems, making this step essential for professional work.
This straightforward process can be completed in minutes—a small investment for big gains in accuracy and consistency, ultimately saving you time and improving your final sound.
As an affiliate, we earn on qualifying purchases.
Comparison: Cheap SPL Meters vs. High-End Class 1 Devices
| Feature | Budget Meter (e.g., RadioShack, Galaxy CM-140) | Class 1/2 Meter (e.g., NTi, Larson) |
|---|---|---|
| Price Range | $50–$150 | $300–$1000+ |
| Precision | Good for rough calibration, ±1–2 dB accuracy | Highly accurate, ±0.1 dB, certified calibration |
| Ease of Use | Simple, basic display, some require manual correction | Advanced features, calibration options, more detailed readings |
| Best For | Home studios, beginners, quick checks | Professional calibration, critical listening, mastering |
If your budget is tight, a budget meter like Galaxy CM-140 still gets you close. However, understanding the limitations of these devices is crucial. Lower-cost meters often have less precise frequency response and may require manual correction or calibration checks to ensure accuracy. They are suitable for general purposes but might introduce small errors that compound during critical calibration tasks. Investing in a high-end Class 1 device offers the advantage of certified calibration, traceability, and minimal measurement error, which is invaluable when your work demands the highest accuracy. For critical listening, mastering, or professional studio environments, the extra expense pays off by giving you confidence that your measurements reflect true SPL levels, reducing guesswork and ensuring your mixes translate reliably across systems.
As an affiliate, we earn on qualifying purchases.
Avoid These Common Mistakes When Calibrating
- Using A-weighting or fast response. These settings distort your SPL readings, especially at bass frequencies, because they either emphasize or de-emphasize certain parts of the spectrum and respond too quickly to transient peaks. Always stick to C-weighted, slow response settings, which give a more accurate representation of perceived loudness at your listening position and avoid measurement errors that can lead to miscalibrated levels.
- Calibrating with music. Music has dynamic peaks, transient transients, and varying energy levels that can skew your readings. Pink noise provides a flat, predictable energy distribution, making it the ideal test signal for calibration. Using music can lead to inconsistent levels, causing your monitors to be set too high or too low, which affects translation and clarity.
- Playing both speakers during calibration. Summing signals from both speakers can artificially inflate SPL readings by about 3 dB due to phase addition, and can cause comb filtering—where certain frequencies cancel or reinforce each other—leading to false readings. Calibrate each speaker individually to ensure accurate level setting. This approach maintains the integrity of stereo balance and prevents calibration errors that could mislead your mixing decisions.
- Holding the meter at the wrong spot. Your ears are at the listening position, so place the SPL meter there at ear level, pointing toward the ceiling. Holding the meter elsewhere—like near the speakers or on a stand—can produce misleading readings because SPL varies with position, especially in untreated rooms. Consistent placement ensures your calibration reflects what you actually hear, leading to more reliable and meaningful level settings.
- Assuming calibration is permanent. Conditions change—furniture moves, speakers are repositioned, or room acoustics shift. Regularly recheck your calibration to maintain accuracy. Even small changes can impact SPL readings, so periodic verification ensures your levels stay consistent, preserving your ability to make precise mixing decisions over time.
As an affiliate, we earn on qualifying purchases.
How Streaming Loudness Norms Make Accurate Level Setting More Important
Streaming services like Spotify and YouTube normalize loudness to around -14 LUFS, reducing the loudness war and promoting more consistent perceived volume across platforms. However, this standardization makes your fixed SPL calibration even more critical. If your monitors aren’t set to a known, consistent level, your perception of loudness can be skewed, leading you to overcompensate or under-adjust during mixing. Proper calibration ensures your initial listening level aligns with these standards, helping your mixes sound balanced and professional regardless of the playback environment.
By calibrating your monitors to a specific SPL—say 83 dB SPL per speaker—you create a stable reference that aligns your subjective loudness perception with objective measurements. This consistency allows you to craft mixes that translate well across streaming platforms, broadcast, and other media, because your starting point is reliably calibrated. It also helps you understand how loud your mix actually is in terms of LUFS, enabling more precise control over perceived loudness and avoiding surprises when your music hits streaming algorithms or loudness meters.
The Real Benefits of Fixed Monitor Levels in Your Studio
Setting a fixed SPL for your monitors isn’t just about achieving accurate measurements—it fundamentally enhances your entire workflow. When your ears are consistently exposed to a known, calibrated level, your decisions become more precise because you can trust your perception. Whether adjusting EQ, compression, or effects, having a stable reference point minimizes guesswork and allows for more predictable results. This consistency also reduces ear fatigue, as you avoid listening at dangerously high levels that can cause long-term hearing damage. Regular calibration encourages disciplined listening habits, promoting better hearing health over time.
Additionally, it simplifies your workflow. With a reliable SPL reference, you can use loudness meters and your experience to gauge how your mixes will translate across different environments. Over time, you’ll develop an intuitive sense of what certain dB SPL levels or LUFS values sound like, making your mixing process more efficient and professional. Ultimately, fixed calibration levels help you produce more consistent, high-quality mixes that sound great everywhere, from earbuds to large speakers.
Key Takeaways You Can Use Today
- Use pink noise at -20 dBFS RMS for a reliable, flat test signal. This ensures a predictable baseline for calibration, reducing errors caused by dynamic content.
- Position your SPL meter at ear level and point it toward the ceiling for accurate readings. Consistent placement minimizes measurement variability caused by room acoustics or positional differences.
- Calibrate each channel separately, aiming for exactly 83 dB SPL (or your chosen level). This ensures balanced stereo imaging and accurate level matching, crucial for translation and clarity.
- Recheck after any gear or furniture moves. Conditions change, and so should your calibration. Regular re-verification keeps your levels reliable over time.
- Match your monitor levels to streaming loudness norms for more consistent translation. This helps your mixes sound professional and balanced across different platforms and playback systems.
Frequently Asked Questions
Can I do this with just a phone app?
Yes, some smartphone SPL apps are validated for basic calibration, especially on iOS. However, dedicated SPL meters tend to be more accurate and reliable. If you’re serious about calibration, investing in a decent meter pays off in precision.
What SPL should I aim for in my small, untreated room?
In smaller, untreated spaces, 73–79 dB SPL per speaker is common due to room gain. The key is consistency—pick a level, calibrate, and stick with it. This helps your mixes translate better, even if your room isn’t perfect.
How often should I re-calibrate?
Recheck your levels whenever you move your speakers, furniture, or change your setup. Doing it periodically—say, every few months—keeps your environment stable and your mixes predictable.
Is fixed SPL calibration enough without room correction software?
While room correction tools help with EQ, fixed SPL calibration ensures your levels are consistent and accurate. They work hand-in-hand—calibration sets the foundation, room correction fine-tunes the sound.
Why is 83 dB SPL the standard reference?
This level comes from film and broadcast standards, designed to keep audio comfortable and non-fatiguing while providing enough headroom for professional work. It’s a sweet spot for clarity and translation.
Conclusion
Calibrating your monitors with an SPL meter is a simple step that pays off across every part of your workflow. It anchors your listening environment, making your mix decisions more consistent, reliable, and healthier for your ears. Don’t skip this—your future mixes depend on it—so grab that meter and set your levels today.Halloween Picks
halloween
As an affiliate, we earn on qualifying purchases.