
TL;DR

Get audio and creator gear delivered free — and shop member deals
- Fast, free delivery on millions of items
- Access to Prime Big Deal Days deals on October 6–7
- Prime Video, Amazon Music and more included
Raising your studio monitors so the tweeters are at ear level ensures more accurate high frequencies and better stereo imaging. Measure your ear height, adjust with a riser, and aim for symmetry for optimal results.
Ever notice how your mixes sound great in the studio but fall flat elsewhere? The secret often lies in the tiniest detail: the height of your monitors’ tweeters. Getting them to ear level isn’t just about comfort — it’s about clarity, accuracy, and making your music sound as good on other systems as it does to your ears.
In this guide, you’ll learn how to measure, calculate, and adjust your monitor setup so that tweeters sit right at your ear height. No fancy gear needed — just a tape measure, some common sense, and a few tweaks. Let’s fix that high-frequency sweet spot and supercharge your mixing accuracy.
Always measure your seated ear height and compare it to your monitor’s recommended acoustic axis.
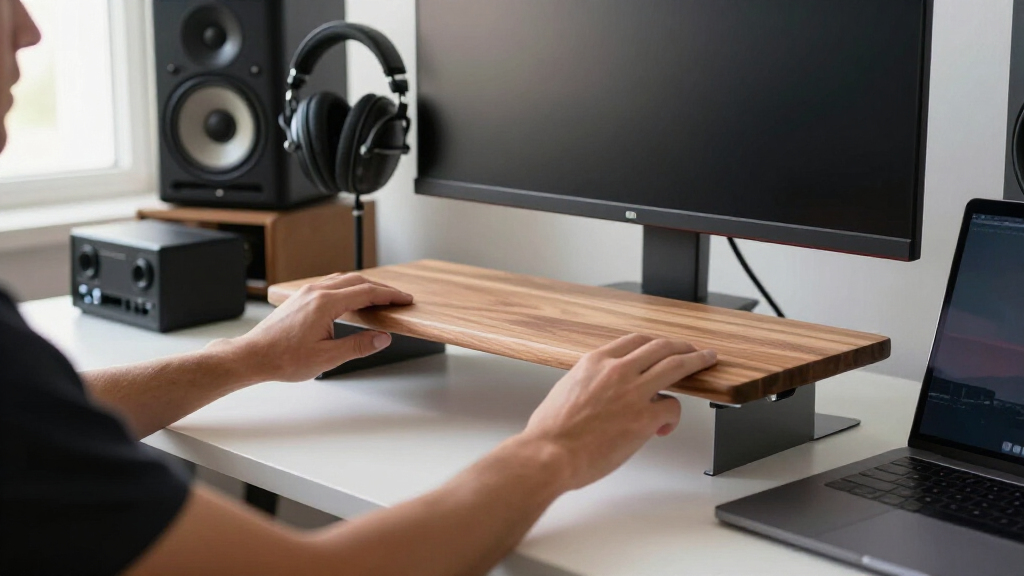
A riser around 10-15 cm often aligns tweeters with ear level for most seated positions.
Use a sturdy, stable stand or custom riser — soft pads can compress and shift over time.
Place monitors in a symmetrical, triangular setup, with equal distance and proper toe-in.
Combine correct height with room treatment and proper placement for best sound quality.
Monitor Riser Height: Getting Tweeters to Ear Level
Raise the monitor’s recommended acoustic axis to your seated ear height for clearer treble, sharper stereo imaging, and mixes that translate with greater confidence.
Treble travels on a tighter path.
High frequencies are more directional than low frequencies. Sitting substantially above or below the intended axis can change treble balance and expose crossover irregularities between the tweeter and woofer.
Hear the intended top end
Correct vertical alignment reduces off-axis coloration, helping vocals, cymbals, air, and transient detail remain proportionate.
Keep the center stable
Matched heights and distances help direct sound reach both ears consistently, preserving placement, depth, and phantom-center focus.
Make safer mix decisions
A trustworthy listening axis reduces the urge to over-brighten or dull a mix in response to a misleading monitor position.
Calculate the riser before you buy it.
Measure every height from the same floor reference. Sit naturally and account for compression if the riser includes soft isolation material.
Measure your ears
Sit in your usual working posture and measure vertically from the floor to the center of your ear.
Ear height: 120 cmMeasure the axis
Find the manufacturer’s recommended acoustic axis and measure its current height from the same floor.
Current axis: 105 cmSubtract & verify
Subtract axis height from ear height, install a stable riser, then remeasure both speakers while seated.
Required lift: 15 cmChoose stability before convenience.
Raising is usually the cleanest option because it keeps the monitor upright and preserves the intended dispersion pattern. Tilting remains a valid compromise when furniture, screens, or limited space prevent ideal elevation.
| Setup factor | Solid riser | Angled wedge | Books / soft pads |
|---|---|---|---|
| Preserves upright orientation | ✓ Strong | ~ Angle-dependent | ~ Variable |
| Mechanical stability | ✓ Best choice | ✓ If secured | ✕ Often uneven |
| Resistance to compression | ✓ High | ~ Material varies | ✕ Recheck often |
| Best use case | Permanent accurate setup | Height is physically limited | Short-term measurement test |
Raise when practical
Use rigid, weight-rated stands or risers with a stable footprint. Confirm that neither enclosure can slide, rock, or tip.
Tilt with precision
Match both angles, point the specified axis at the listening position, and follow the monitor manufacturer’s orientation guidance.
Height only works when the triangle is balanced.
Start with an approximately equilateral triangle: the distance between monitors should resemble the distance from either monitor to your listening position.
Aim for the axis—not a universal number.
“Tweeters at ear level” is a useful starting rule, but monitor designs vary. The reference may sit at the tweeter, between drivers, elsewhere on the baffle, or along the center of a coaxial driver. Manufacturer guidance takes priority.
One small lift improves the entire monitoring decision path.
Quick setup answers
Must tweeters be exactly at ear level?
No. Keep your ears inside the intended vertical listening window. A few centimeters of offset is often acceptable; large offsets deserve correction.
How tall should my riser be?
Subtract the current acoustic-axis height from your seated ear height. Ten to fifteen centimeters is common, but your measurements decide.
Can I use foam pads?
Isolation pads can work, but soft material may compress or shift. Measure again after the monitor’s full weight has settled.
Are stacked books acceptable?
They can test a proposed height, but uneven surfaces and limited stability make purpose-built stands or rigid risers safer long-term.
Does correct height solve room acoustics?
No. Height improves direct sound, while desk reflections, boundary effects, bass cancellations, and room decay still require thoughtful placement and acoustic treatment.
Elevate the axis. Stabilize the image. Trust the mix.
Measure from the floor, follow the monitor’s documented reference axis, raise both sides equally, and verify the triangle. This modest physical adjustment can reveal more detail without changing a single piece of audio gear.
Why Tweeter Height Matters More Than You Think
High frequencies are highly directional. If your ears sit below or above the ideal listening axis, those treble details can get lost or exaggerated. Imagine trying to hear a whisper in a crowded room — the angle matters. When your tweeters are at ear level, you get a stable, clear high-frequency response that helps you hear vocals, cymbals, and details precisely as intended.
For example, if you sit 120 cm from the floor and your monitors’ acoustic axis is at 105 cm, your high-end response might be skewed. This can make your mixes sound dull or overly bright when played on other systems. Keeping the tweeter’s axis aligned with your ears preserves the tonal balance you’re aiming for.
Proper tweeter height is essential because it directly influences how accurately you perceive the high-frequency content of your mix. When the sound waves from the tweeters hit your ears at the intended angle, you’re hearing the monitor’s designed frequency response as accurately as possible. Misalignment can lead to misjudging tonal balance, causing you to overcompensate or neglect certain elements. This is the tradeoff: sacrificing tweeter alignment may seem minor but can significantly distort your perception and, consequently, your mixes.
As an affiliate, we earn on qualifying purchases.
How to Calculate the Perfect Riser Height in 3 Easy Steps
- Measure your seated ear height from the floor — let’s say it’s 120 cm.
- Check your monitor’s recommended acoustic axis height — often around 105 cm for many monitors.
- Subtract the monitor’s axis from your ear height: 120 cm – 105 cm = 15 cm.
This means you need roughly a 15 cm riser to bring the tweeter to your ear level. Remember, soft pads compress, so double-check while sitting naturally. Use a tape measure or a laser distance tool for precision. Adjust until your ears are within a couple of centimeters of the monitor’s recommended acoustic axis.
Choosing the correct riser height is a balancing act. Too low, and you won’t achieve the desired high-frequency clarity; too high, and you might tilt the monitor excessively, affecting its dispersion pattern. The goal is to find a height that aligns the tweeter with your ear without compromising the monitor’s intended sound dispersion. This ensures the high frequencies are delivered accurately and consistently, which is crucial for detailed mixing and translation.
As an affiliate, we earn on qualifying purchases.
Raising vs. Tilting: Which Is Better for Your Setup?
Raising your monitors on a sturdy riser is usually the best approach because it preserves the monitor’s designed dispersion pattern and minimizes unwanted reflections. When you tilt a monitor downward, you risk altering the intended dispersion, which can cause uneven sound coverage and phase issues, especially if the tilt is excessive. This can lead to inconsistent imaging and frequency response, making it harder to trust your mix decisions.
However, tilting can be a practical solution if physical constraints prevent raising the monitors. The tradeoff is that tilting may introduce slight changes in the monitor’s dispersion pattern, potentially affecting how sound interacts with your room and your ears. When you tilt, ensure the monitor remains stable and that the driver alignment stays correct; otherwise, you risk creating reflections or off-axis coloration that undermines your listening accuracy. Ultimately, raising is preferred because it maintains the speaker’s original design intent, but tilting can be a useful compromise when necessary.
As an affiliate, we earn on qualifying purchases.
Perfect Placement: Geometry Tips for Accurate Sound
The goal is to create an equilateral triangle between your ears and the monitors. Place the monitors about the same distance apart as your listening position — for example, if you sit 1.2 meters from each speaker, the monitors should be about 1.2 meters apart. Both tweeters should be at the same height, angled slightly inward (toe-in), and centered between your ears.
This symmetry isn’t just aesthetic; it’s fundamental for accurate sound imaging. When your monitors are equidistant and at the same height, the direct sound waves arrive at your ears simultaneously, preserving stereo imaging and clarity. Misalignment or uneven placement can cause phase issues, smearing of stereo images, and uneven frequency response. Therefore, precise geometry ensures that your listening environment is optimized for accurate perception. Use a laser or tape measure to double-check distances and heights, and listen critically to confirm that the stereo image is centered and stable across different listening positions.
As an affiliate, we earn on qualifying purchases.
Frequently Asked Questions
Must tweeters be exactly at ear level?
Not perfectly, but close enough. The goal is to keep your ears within the monitor’s intended listening window. A few centimeters above or below won’t hurt, but large offsets can distort high-frequency response and stereo imaging.
Should I raise or tilt my monitors?
Raising them on a stable riser is usually better for maintaining proper dispersion. Tilting works if you can’t physically raise the monitors, but ensure the angle is stable and aimed correctly toward your ears.
How tall should my monitor riser be?
Measure your seated ear height and subtract the monitor’s recommended acoustic axis height. Typically, 10-15 cm is enough for most seated positions, but adjust based on your specific setup.
Can I just stack books or use foam pads?
Books can be a quick fix but are often unstable or uneven. Purpose-built stands or solid risers are safer, more stable, and won’t compress or vibrate over time.
Do room acoustics matter once I get the height right?
Absolutely. Proper tweeter height improves direct sound, but room reflections, bass cancellations, and boundary effects still influence your sound. Combine physical setup with acoustic treatment for best results.
Conclusion
Getting your tweeters to ear level is a simple yet powerful upgrade for your studio. It sharpens high-frequency clarity, improves stereo imaging, and makes your mixes translate better. Don’t overlook this detail — tiny adjustments now can make a huge difference later.
Remember, a well-placed monitor isn’t just about comfort — it’s about hearing everything as it was meant to be heard. Elevate your gear, and let your mixes speak clearly.
Fall Picks
fall essentials
As an affiliate, we earn on qualifying purchases.