
TL;DR

Get audio and creator gear delivered free — and shop member deals
- Fast, free delivery on millions of items
- Access to Prime Big Deal Days deals on October 6–7
- Prime Video, Amazon Music and more included
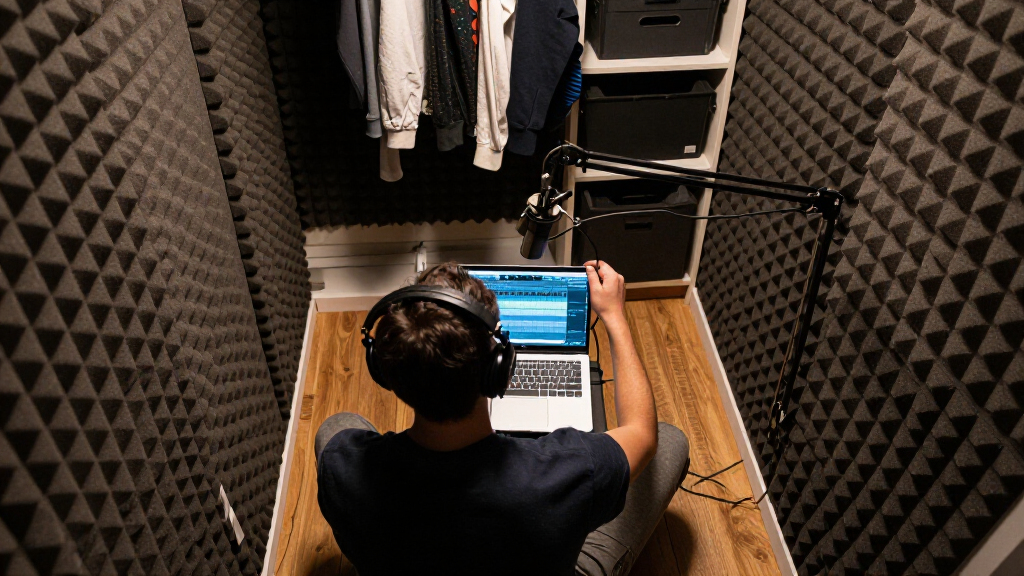
Recording in a closet can reduce reverberation and improve vocal clarity, but it often creates boxy, muffled sound if the space is too small or poorly treated. Testing and proper placement are key to making it work.
Few things are more tempting than turning a tiny, cluttered closet into a quick recording booth. It’s easy, cheap, and often surprisingly effective — at least for certain voices.
But don’t assume that stuffing your mic into a closet automatically makes everything sound better. Without understanding what works and what backfires, you might end up with a recording that’s dull, hollow, or just plain unusable. This guide cuts through the hype and shows you exactly when a closet is a practical tool — and when it’s a trap.
Clothing absorbs high and mid frequencies but doesn’t fix low-frequency resonances.
Testing different mic placements and facing directions yields better results than adding more soft materials.
Recording in a closet works best for speech at moderate volume, not loud singing or instruments.
An open closet facing into a larger room often outperforms a sealed, tiny closet.
Post-processing can help but cannot fix severe resonances or poor initial capture — aim for the best sound at record time.
Home recording field guide · vocal acoustics
Recording in a Closet: When It Works and When It Backfires
A clothes-filled closet can reduce reverberation and sharpen spoken-word clarity—but a cramped enclosure can also leave your voice dull, hollow and aggressively boxy. The winning move is not more fabric. It is testing the geometry, microphone position and direction before the real take.
01 · The operating window
Where the closet earns its keep
A closet is useful when unwanted room reflections are the main problem and the source does not strongly excite the enclosure.
Strong fit
Spoken word
Close-miked narration at moderate volume gains intimacy as clothing reduces flutter echo and bright room reflections.
Helpful geometry
Room to breathe
A larger, irregular closet lets the performer and microphone stay away from walls, shelves, corners and exact centers.
Useful material
Thick, loose layers
Coats, quilts and garments with depth absorb more effectively than thin shirts or tightly compressed clothing.
Warning signs: when the booth becomes the problem
Geometry risk
Tiny and square
Closely spaced reflections and pronounced room modes create nasal, hollow or “cupped hands” coloration.
Placement risk
Mic against a boundary
Corners, walls, hard shelves and nearby doors intensify low-mid buildup and early reflections.
Source risk
Loud, full-range sound
Powerful singing and instruments excite resonances more strongly—and heat or poor ventilation can degrade the performance.
02 · Setup comparison
Choose the least compromised capture
No configuration wins everywhere. Compare the tradeoffs in your actual room using the same script, gain and microphone distance.
| Setup | Echo control | Boxiness risk | Natural tone | Best use |
|---|---|---|---|---|
| Inside a tiny closed closet | ✓ HIGH | ✗ HIGH | ✗ LOW | Only if testing proves it works |
| At an open closet, facing outward | ✓ GOOD | ✓ LOWER | ✓ HIGH | Frequent best starting point |
| In the room with absorption behind | ~ MEDIUM | ✓ LOW | ✓ HIGH | Rooms with manageable ambience |
| Bare reflective room | ✗ LOW | ~ VARIABLE | ~ ROOMY | Only when room sound is intentional |
03 · What clothing actually does
Absorption is not soundproofing
Soft material can improve what happens inside the space. It does not create the dense, airtight barrier needed to stop sound entering or leaving.
Two different acoustic jobs
Treatment versus isolation
Confusing these goals leads to disappointing sessions: the closet may sound less echoey while traffic, HVAC, footsteps and conversations remain clearly audible.
Qualitative absorption profile
Clothing favors the upper range
Relative effectiveness varies with thickness, density, spacing and the air gap behind the material.
04 · Placement before padding
Open closet often beats sealed box
Placement changes the balance between direct voice, clothing absorption and room ambience more dramatically than another blanket usually will.
Preferred starting test
At the open closet
Let the clothes absorb nearby reflections while the microphone and performer remain outside the tight enclosure. Facing outward can retain a more natural tone.
Higher-risk test
Deep inside the closet
Avoid exact centers, corners and walls. Keep the microphone off the clothing, angle it if the sound is dull and listen carefully for low-mid congestion.
Traceability chain · from setup to decision
Place
Move the mic away from corners, hard shelves and exact room centers.
Record
Capture the same short script in four configurations at matched gain.
Compare
Check headphones and speakers for honk, boom, dull consonants and noise.
Commit
Choose the most natural raw take—not simply the driest waveform.
The bottom line
Test the space, not the myth.
A closet works when it improves the voice-to-room balance without imposing its own low-mid signature. Start near an open, clothes-filled closet, control plosives and proximity effect, then compare short takes. If the raw voice sounds natural, clear and comfortable, you have found a workable booth.
When a closet really works to boost your sound
Picture a quiet afternoon. You’re recording a voice-over or a podcast. The room around you is full of hard surfaces — windows, bare walls, or a kitchen with tile floors. In that scenario, a closet filled with clothes can cut down on echo and flutter echo, giving your voice clarity and warmth.
Closets excel when:
- You’re doing spoken word, audiobooks, or narration at moderate volume
- The space is large enough to keep the mic away from walls and corners
- You have thick, irregular clothing that acts as a natural absorber
- Reverberation and ambient noise are your main concern
For example, a creator recording a voice-over in a spare bedroom found that stuffing the closet with coats and blankets resulted in a dry, intimate sound perfect for a narration project. The clothes absorbed high frequencies, leaving the voice warm and clear, with little room echo.
As an affiliate, we earn on qualifying purchases.
When a closet turns your sound into a muffled nightmare
Now, imagine cramming into a tiny, nearly square closet with hard walls and a microphone pressed right against hanging shirts. The result? A hollow, nasal tone that sounds like you’re talking inside a box.
Closets backfire when:
- The space is too small or square, trapping sound inside
- Microphone is placed too close to walls or shelves
- Clothes remove treble, but low-mid resonances build up, creating a boxy, muffled sound
- You sing loudly or play instruments that excite resonances
An artist recording a loud, full-range vocal inside a tiny closet reported that her voice sounded distant, with a strange hollowness. Trying to EQ out the muddiness only made her voice thin and unnatural — the problem was the space itself.
acoustic treatment for closet recordings
As an affiliate, we earn on qualifying purchases.
As an affiliate, we earn on qualifying purchases.
Clothes alone can’t soundproof — here’s why
Many assume that filling a closet with clothes makes it soundproof. That’s not true. Clothes absorb some high and mid frequencies inside the room but do little to block outside noise or prevent sound from leaking out.
Understanding this distinction is crucial because it influences how you approach your space. Soundproofing involves creating a barrier that prevents sound waves from passing through walls, which requires dense, airtight materials like mass-loaded vinyl, drywall, or specialized acoustic barriers. In contrast, absorption — what clothes do — reduces the reflection of sound waves within a space, making the sound inside less echoey but not stopping external noise from entering or leaving. Recognizing this helps prevent the misconception that a closet full of clothes will isolate your recordings from noisy environments, which it won’t.
microphone stand for home recording
As an affiliate, we earn on qualifying purchases.
As an affiliate, we earn on qualifying purchases.
How clothing helps — and why it’s still not enough
Clothing is porous absorption. Thicker, looser garments like quilts and heavy coats absorb more high and mid frequencies than thin shirts. An air gap behind the cloth improves low-frequency absorption, but won’t eliminate resonances in the bass range.
For instance, a voice recorded in a closet with a thick quilt behind the mic sounded clear in the treble but boomy and boxy in the low mids. The clothing dampened some reflections but couldn’t tame the room’s bass resonances.
This highlights an important tradeoff: while clothing can improve clarity by reducing high-frequency reflections, it may simultaneously emphasize or fail to address problematic low-frequency resonances inherent to small, enclosed spaces. Over-reliance on clothing without considering room dimensions and resonances can lead to a sound that’s still muddled or unnatural. Effective sound treatment requires balancing absorption with room geometry awareness to achieve a natural, balanced tone.
As an affiliate, we earn on qualifying purchases.
Microphone placement tricks for closet success
Placement often beats more soft material. Keep your mic away from corners and walls, and aim it toward the clothes or into the room depending on the effect you want.
For example, a voice actor facing into a closet with hanging shirts found that angling the mic slightly away from the clothes reduced dullness. Using a pop filter at about 10 centimeters helped avoid plosives and proximity bass boom.
Experiment with facing into or away from the clothes. Sometimes, facing the mic outward toward the room gives more natural sound while still cutting reflections.
Understanding the tradeoffs involved in placement is key. For instance, angling the mic away from the clothes can reduce the muffling effect but might introduce more room sound. Conversely, facing into the clothes can trap reflections but yield a more intimate tone. The optimal position depends on your specific space, voice, and the sound you’re aiming for.
Should you record inside or facing an open closet?
In many cases, recording with the closet open and the mic facing into the room yields better results. The clothes absorb reflections entering the mic’s front, but you avoid trapping the sound inside a tiny box.
For example, a podcaster positioned near an open closet, with the mic facing into the room, achieved a warmer, less boxy tone than recording inside the closet itself.
This approach balances absorption and space. By facing the mic outward, you allow some room ambiance to be captured, which can add naturalness and prevent the recording from sounding overly dead or muffled. It’s a tradeoff: open closet recordings can retain more of the room’s character, but may pick up more ambient noise. Testing both methods in your space will reveal which yields the most natural, clear sound for your needs.
How to test if your closet recording actually works
Before committing to a full session, do quick tests. Record short clips in different setups: in the room, inside the closet, with the closet door open, and with portable absorption panels.
Listen carefully on headphones and speakers for:
- Boxiness or honk
- Excessive bass
- Dull consonants
- Room reflections or flutter echoes
- Background noise
A simple hand clap can reveal resonances. If the clap rings out in a strange way, the space likely needs treatment. More importantly, listening critically helps you identify whether the sound is natural, balanced, and free of problematic resonances. This process allows you to make informed adjustments before recording your main content, saving time and ensuring a higher-quality result.
What can be fixed after recording? Why it’s better to get it right first
Post-production tools like EQ, noise reduction, and de-reverberation can help improve a rough closet recording. However, heavy processing can cause unnatural sounds, metallic artifacts, or loss of clarity.
For example, AI de-reverb might help reduce some echo but can also make voices sound hollow or robotic if the original recording is too boxy or resonant. The key is capturing a clean source from the start, as excessive processing often introduces new issues or emphasizes existing problems. A well-recorded source minimizes the need for extensive editing, preserving natural tone and clarity. Remember, the best results come from a good initial capture; post-processing should be used to enhance, not fix fundamental flaws.
New tech trends making closet recording easier
Recent advances include AI tools for noise reduction and de-reverberation, which can salvage less-than-ideal recordings. Affordable dynamic mics and small portable panels also make it easier to get decent sound in imperfect spaces.
For example, a creator used an AI-based plugin to clean up a noisy closet recording, making it suitable for a professional podcast. These tools expand what’s possible, but they’re no substitute for good setup.
Understanding how to leverage these technologies can significantly improve your workflow and final sound quality. However, relying solely on AI to fix poor initial recordings often results in less natural sound and less control over the final tone. Combining good microphone placement, room understanding, and modern tools provides the best pathway to professional-sounding results.
Practical tips to get the most out of closet recordings
Start with the quietest, largest space possible. Compare the closet with the room before adding treatment. Use thick, broadband absorption and leave space between the mic, clothes, and walls.
Record at conservative levels to prevent clipping. Turn off noisy equipment and take breaks during long sessions. Save an unprocessed file before any post-processing.
For example, a voice-over artist found that experimenting with mic position and room setup made a huge difference — often more than buying new gear.
Frequently Asked Questions
Is a closet good for recording vocals?
It can work well for spoken voice, narration, or restrained singing when the surrounding room is reflective. Loud singing or full-range instruments often reveal the space’s resonances and turn it boxy.
Should I record inside or facing an open closet?
Try both. Facing into an open closet with clothes can absorb reflections without trapping sound inside a small box. Testing your specific space is the best way to find out what works.
Do clothes soundproof a closet?
No. Clothes mainly absorb high frequencies inside the space but do little to block external noise or prevent sound from leaking out. True soundproofing needs heavier, airtight barriers.
Why does my closet recording sound muffled?
The clothing probably absorbs most treble, leaving a dull, muffled tone. Placing the mic too close to garments or in a tiny space can also worsen this effect.
Can AI fix a poor closet recording?
AI tools can reduce some echo and noise, but they can’t fix severe resonances or unnatural coloration. The best approach is a good initial recording and careful placement.
Conclusion
Your closet can be a handy quick fix or a creative tool — if you understand its limits and how to use it wisely. Think of it as a puzzle piece, not the whole picture.
Remember: testing, placement, and patience matter more than fancy materials or gear. When you get it right, your voice can sound warm, clear, and professional — even in a tiny, cluttered closet.
Fall Picks
fall essentials
As an affiliate, we earn on qualifying purchases.