TL;DR
Listen free for 30 days with Audible
Thousands of audiobooks and originals — cancel anytime.
Start your free trialAs an affiliate, we earn on qualifying purchases.
Choosing the right placement and mounting technique is key to reducing clothing rustle and hiding your lav mic. Testing with realistic movement and securing cables properly can make a big difference. Concealment often involves balancing sound clarity with invisibility, and no single method works best for everyone — testing is vital.
Ever had a mic rub against fabric right when you’re about to nail a perfect take? That squeak or rustle can ruin even the best audio shot. The secret isn’t just in the gear — it’s in where and how you place that tiny microphone on your performer.
This guide reveals tested, real-world techniques to hide lav mics, cut down on clothing noise, and keep your audio clear and discreet. Whether you’re filming a tight interview, a dramatic scene, or just want your gear to stay invisible, understanding placement and mounting makes all the difference.
Placement is king; a well-positioned mic beats expensive gear every time.
Test with realistic movement — what works standing still may fail during action.
Isolation techniques like tape sandwiches and purpose-built mounts reduce clothing noise.
Choose between skin and clothing mounting based on comfort, wardrobe, and scene needs.
Cable routing and strain relief are often overlooked but critical for quiet, reliable audio.
Lav Mic Placement: Clothing Noise and Hiding Techniques
Clear dialogue starts before the recorder rolls. The winning setup places the capsule where speech sounds natural, isolates it from moving fabric, and secures the cable so mechanical vibration cannot reach the microphone.
Placement beats price when fabric is moving
A modest microphone mounted securely in a quiet location will usually outperform premium equipment rubbing against clothing. Treat placement as the foundation of the signal chain.
Find the vocal sweet spot
Start at the center chest. Too low can sound distant; too close to the throat can emphasize breathing, swallowing, and chest resonance.
Create space around the capsule
Keep fabric away from the sound inlet. A protected air gap and soft barrier reduce direct rubbing and vibration transfer.
Control the entire cable
Add a small strain-relief loop below the mic, then secure the cable again so pulling and tapping cannot travel into the capsule.
Know what is actually making the noise
Rustle is mechanical. It begins when fabric, accessories, skin, the capsule, or the cable move against one another. Identify the contact point before changing the microphone.
Balance clarity, consistency, and invisibility
The best hiding point depends on wardrobe structure and performer movement. Begin with the center chest, then move only when the costume or scene demands it.
Center chest
Balanced speech and relatively stable levels during head turns. Keep the capsule protected from the outer garment.
Shirt placket
Convenient and discreet between buttons, but the mic must be isolated from fabric on both sides.
Under a collar
Easy to hide, though head turns may darken the voice or alter the level if the capsule becomes occluded.
Tie or tie knot
Visually effective when the tie stays controlled. Prevent contact with both the shirt and moving tie fabric.
Bra or undershirt
A supportive base can hold the mic securely. Isolate the capsule from skin, seams, and garment edges.
Hair or hairline
Often provides open sound when chest placement fails. Visibility, hair movement, and cable routing need close attention.
Build a quiet pocket around the microphone
Every successful concealment method does two jobs: it prevents direct fabric contact and stops the capsule from moving.
Tape sandwich
Place the capsule between small pieces of medical or cloth tape while leaving a protected air gap around the inlet. Avoid compression.
Soft concealer
Silicone, rubber, foam, or molded mounts hold the lav securely and absorb vibration during active scenes.
Moleskin barrier
Felt, fleece, or moleskin creates a soft friction buffer for rough, textured, or vibrating garments.
Fabric cover
A small soft or fur cover can reduce contact noise under stiff clothing, but too much material may dull high frequencies.
Adhesive pad
Double-sided adhesive and an undercover can anchor the mic to skin or clothing. Replace it when heat or sweat weakens the bond.
Clothing mount or skin mount?
Neither approach is automatically quieter. Choose according to comfort, wardrobe behavior, movement, access, and the level of concealment required.
| Decision factor | Clothing mount | Skin mount | Best practical choice |
|---|---|---|---|
| Setup speed | ✓Usually faster and easier to adjust. | ~Requires privacy, care, and skin-safe adhesive. | Clothing for rapid interviews and simple wardrobe. |
| Fabric movement | ~Can shift, fold, or rub around the capsule. | ✓Often isolates the mic from the outer layer. | Skin when outer garments are loose or unstable. |
| Performer comfort | ✓Keeps adhesive away from sensitive skin. | ~Heat, hair, sweat, and adhesive may irritate. | Use the least intrusive option that stays quiet. |
| Active movement | ~Needs strong cable anchoring and isolation. | ✓Can remain stable when correctly secured. | Test the exact choreography before deciding. |
| Maintenance | ✓Easy to inspect between takes. | ~Adhesive can loosen as perspiration increases. | Monitor both continuously during production. |
Test the complete system, not a stationary performer
A hidden microphone can sound perfect at rest and fail as soon as the scene begins. Follow the same verification chain before every critical take.
Place
Choose a position based on voice, clothing structure, and concealment.
Isolate
Protect the capsule from fabric and keep the sound inlet open.
Anchor
Add strain relief and secure the cable at additional points.
Move
Walk, sit, turn, reach, breathe deeply, and perform at full energy.
Monitor
Listen throughout the take and recheck after wardrobe or blocking changes.
The quiet-mount rule
Secure the microphone, protect the capsule, relieve the cable, then test the scene. If rustle remains, change the contact geometry before reaching for post-production. Small placement adjustments often create a larger improvement than more expensive equipment.
Six checks before the camera rolls
Why Placement Is More Important Than Buying the Priciest Mic
Your lav mic’s position can make or break your sound — more than its price tag. Even a cheap, solidly mounted mic in the right spot beats a fancy one rubbing against fabric. Think of placement as the foundation of good sound: it’s where the magic starts.
For example, a mic tucked into a shirt placket often captures crisp dialogue while staying hidden. But if it’s too low, it sounds distant or muffled. If it’s too close to the throat, it picks up breathing and swallowing. Testing different locations on the performer helps find that sweet spot where sound is natural and noise is minimized.
Why this matters: a well-placed mic reduces the need for post-production fixes, which can often compromise audio clarity. It also minimizes the risk of picking up unwanted sounds or clothing friction, leading to a more professional and seamless audio track. The tradeoff is that perfect placement requires time and sometimes multiple tests, especially when dealing with dynamic scenes or active performers.
lav microphone clothing noise reduction
As an affiliate, we earn on qualifying purchases.
As an affiliate, we earn on qualifying purchases.
Common Clothing Noise Traps—and How to Avoid Them
Clothing noise happens when fabric rubs, folds, or vibrates against the mic or cable. It’s like rubbing two plastic bags together — loud and distracting. Fabrics like nylon, silk, and sequins are especially noisy, as are stiff waterproof shells.
Here are the top culprits:
- Fabric brushing directly against the capsule
- Multiple layers rubbing near the mic
- Loose cables striking buttons, jewelry, or skin
- Stiff fabrics and shiny materials like sequins or leather
- Necklaces or badges moving near the mic
Understanding why these noises happen is crucial because it informs your choice of materials and mounting methods. For instance, stiffer fabrics tend to vibrate more and transmit those vibrations directly into the mic, creating constant rustle. Sequins or leather reflect sound and can cause high-frequency noise that’s hard to remove later. Testing each costume beforehand helps you identify which fabrics are problematic, allowing you to adapt your mounting or choose better clothing options. The tradeoff: some costumes might look visually appealing but are incompatible with clean audio, so balancing aesthetic and technical needs is key.
discreet lavalier mic mounting kit
As an affiliate, we earn on qualifying purchases.
As an affiliate, we earn on qualifying purchases.
Where to Hide a Lav Mic for the Best Balance of Sound and Discretion
The best hiding spots depend on the wardrobe and scene. But some locations are universally effective:
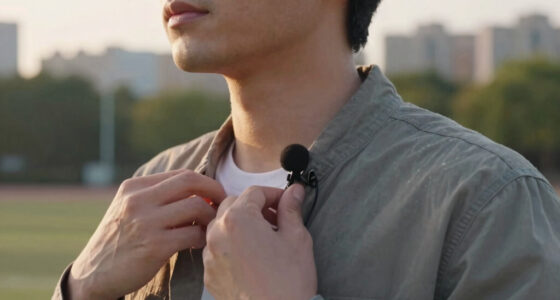
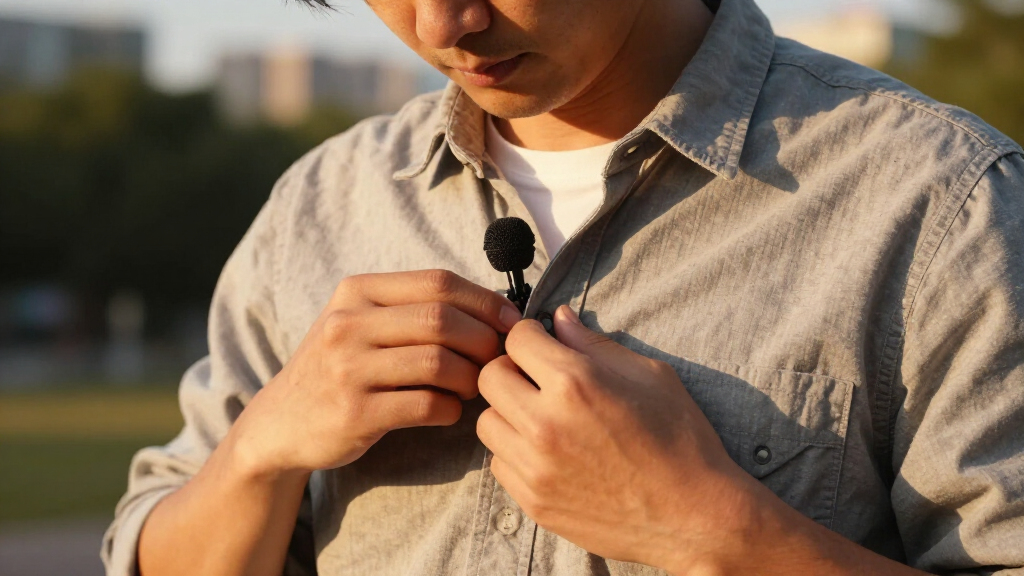
- Center of the chest: Balances natural sound and visibility. About 15–20 cm below the mouth, this spot generally gives consistent levels as the performer moves. It’s close enough to capture clear audio but far enough to stay hidden under clothing.
- Inside a tie or between buttons: Looks clean and offers open sound, but requires careful protection from fabric contact and movement. The tradeoff is that it can shift if the costume moves dramatically, so securing it well is essential.
- Under a collar: Easy to conceal and less prone to clothing friction, but head turns can darken the sound or cause occlusion. Proper positioning ensures the mic remains close enough for clarity without being visible.
- Inside a bra or undershirt: Provides a stable mount, especially for women, but needs to be isolated from skin and fabric edges to prevent noise. It’s effective but can be uncomfortable or noticeable if not positioned carefully.
- Hair or hairline: Good for minimal wardrobe or when other options clash with costumes. It can deliver open sound if cable routing is done thoughtfully, but visibility and movement need to be considered.
Understanding the implications: each hiding spot involves a tradeoff between concealment, sound quality, and ease of placement. Testing during rehearsals helps identify which position offers the best compromise for your specific scene and wardrobe, ensuring you don’t sacrifice clarity for invisibility or vice versa.
AmazonAs an affiliate, we earn on qualifying purchases.
How to Mount and Conceal a Lav Mic Without Making It Obvious
Mounting a lav so it stays hidden and quiet takes a mix of simple tools and clever tricks. Here are some proven methods, along with the reasoning behind each:
- Tape sandwich: Place the capsule between two small pieces of medical or cloth tape, leaving a tiny air gap. This isolates the mic from fabric friction and reduces rubbing noise. The air gap acts as a buffer, preventing direct contact that causes rustle. Avoid over-tightening, which can muffle sound or distort the capsule’s response.
- Purpose-built mounts: Soft silicone or rubber mounts hold the mic securely, preventing movement and contact with clothing. They are designed to absorb vibrations and reduce noise transmission, which is especially useful in active scenes where movement can cause cable noise or mic rubbing.
- Moleskin or soft fabric: Wrapping the mic in felt or fleece creates a soft barrier that dampens vibrations and friction. Taping this assembly in place ensures the mic remains stable. This method is particularly effective for costumes with rough or textured fabrics that tend to vibrate or rub against the mic, thus reducing both clothing noise and cable movement noise.
- Fur or fabric covers: Small covers absorb clothing noise but can slightly dull high frequencies. They act as a noise buffer, especially under tight or stiff costumes, but must be used judiciously to avoid muffling the sound excessively.
- Adhesive pads and undercovers: Double-sided adhesive with soft barriers can stick the mic to skin or inside garments. This minimizes movement and noise from clothing rubbing. However, they need regular replacement to maintain adhesion, especially when sweaty or in humid conditions, to prevent the mic from shifting during action.
Understanding why these methods matter: each technique aims to minimize mechanical vibrations and fabric contact that cause noise. The tradeoff involves balancing ease of attachment, comfort, and maintaining sound quality. For example, a silicone mount inside a collar may be discreet and stable but requires proper testing to ensure it doesn’t shift during movement, which could reintroduce noise or reduce clarity.
Amazonmicrophone cable strain relief clips
As an affiliate, we earn on qualifying purchases.
As an affiliate, we earn on qualifying purchases.
Clothing Mounts vs. Skin Mounts — Which One Is Quieter?
Clothing mounting is quick and keeps the mic away from skin, but clothing can shift, fold, or rub against the mic. Skin mounting isolates the capsule from outer fabric and often results in cleaner audio. The choice impacts the overall sound quality and reliability—each has tradeoffs that can significantly influence your final result.
Clothing mounts are easier to implement quickly, making them ideal for fast shoots or when the wardrobe isn’t fixed. However, fabric movement and friction can introduce noise that’s difficult to eliminate later. Skin mounts, by being attached directly to the performer’s body or undergarments, reduce this movement but require more careful placement and comfort considerations. They also demand more preparation, such as skin-safe adhesives and precise positioning, but often yield a more consistent, cleaner audio signal—especially in dynamic scenes.
Why this matters: understanding these differences allows you to choose the right method based on scene requirements, costume complexity, and performer comfort. The tradeoff: skin mounts generally provide better noise isolation but can be less convenient and more invasive; clothing mounts are faster but may require more post-production cleanup. Testing in rehearsal scenarios reveals which approach offers the best balance for your specific situation.
Cable Routing and Strain Relief — Keeping Your Setup Quiet and Safe
Proper cable routing prevents noise and damage. A small strain-relief loop below the mic absorbs tugging and vibration, preventing transmitted noise and accidental dislodging. Securing the cable along the body with clips or tape ensures it stays in place, reducing micro-movements that can generate noise or cause wear.
For example, route the cable from the mic down the chest, behind the arm, and into a pack or transmitter at the waistband. Use clips or medical tape to keep it flat and close to the body, avoiding sharp bends or tight loops that can cause cable fatigue or noise. Properly securing the connection at the transmitter or recorder is equally important to prevent movement and accidental yanks that could disturb the mic or damage the cable.
Why it matters: loose or swinging cables act like antennas for mechanical noise, which can be picked up as unwanted sound. Additionally, strain-relief prevents cable fatigue and failure, prolonging the life of your gear. The tradeoff involves balancing accessibility and discreetness—cables should be secure but not so tight that they restrict performer movement or cause discomfort during extended shoots.
Balancing Concealment and Sound: What You Need to Know
Hiding a lav mic almost always reduces high-frequency clarity because clothing absorbs some of the sound, acting as a barrier. Equalization can compensate for this loss, but it’s no substitute for optimal placement and technique. Moving the mic closer to natural openings — like a collar or button gap — often boosts clarity while remaining discreet, because it minimizes the distance the sound has to travel through fabric, reducing absorption and reflection effects.
Most lavs are omnidirectional, meaning they pick up sound equally from all directions. Proper orientation isn’t as critical as keeping the inlet open and free from fabric contact, which can cause muffling or occlusion. Facing the capsule downward or toward the sound source can help protect it from breath or debris, but the key is consistent positioning during takes.
Why this matters: understanding the physics of sound and fabric interaction helps you make informed decisions about placement. The tradeoff is that closer placement improves clarity but may be more visible or less comfortable, so testing during rehearsals ensures you find the best compromise for your scene and wardrobe.
Troubleshooting Rustle and Noise — What to Do When Things Go Wrong
If you hear rustle, don’t panic. Start by pinpointing whether it’s the capsule, cable, or clothing. Re-secure the cable, add strain relief, and try moving the mic slightly—sometimes a small adjustment can eliminate the noise. For example, if a zipper or button rubs against the mic, reposition it or switch to a skin mount to bypass the problematic fabric contact.
If the fabric itself is noisy, adding a soft cover or isolator—like a foam or fur cover—can help dampen vibrations. It’s also essential to test during movement to identify the source of noise early, as some clothing noises are unavoidable or only reducible to tolerable levels. Recognizing that some rustle is inevitable helps set realistic expectations and guides your approach to mitigation.
Why it matters: addressing noise at the source prevents costly post-production fixes that can compromise audio quality. The tradeoff: some residual noise may be acceptable if it’s less distracting than constant rustle, so understanding your scene’s noise tolerance is crucial.
Frequently Asked Questions
Where is the best place to hide a lav mic?
The most common spot is near the center of the chest, about 15–20 cm below the mouth, balancing sound quality and concealment. Always test to find the location that offers clean audio and minimal clothing noise for your performer’s wardrobe.
How do I stop a lav from rubbing against clothing?
Use isolation techniques like foam or soft mounts, create an air gap around the capsule, and immobilize the cable with strain relief. Testing each setup during movement helps catch and fix noise issues early.
Should the microphone face up or down?
Many omnidirectional lav mics work well in either orientation, as long as the sound inlet remains unobstructed. Facing down can protect from breath and debris, but always test your specific mic’s response in different positions.
Can I tape a lav directly to skin?
Yes, with skin-safe adhesive and an isolating mount. Be cautious about allergies, perspiration, and skin sensitivities. Always get performer consent and remove the mount carefully after filming.
How do I hide a lav under a tight shirt?
Use the thinnest, most flexible mount possible, position it near natural contours or seams, and test visibility and movement. Hair or collar placement may offer better concealment with less noise.
Conclusion
Remember: the best mic placement is the one that stays quiet, stays hidden, and captures natural sound. Don’t just tape it down and hope for the best. Test, adjust, and always consider the performer’s comfort and wardrobe.
Your next shot could hinge on a tiny tweak — a subtle shift that makes all the difference between noisy chaos and clean, professional audio. Keep experimenting, and never settle for guesswork when great sound is within reach.
FALL Fall Picks
fall essentialsfall essentials
As an affiliate, we earn on qualifying purchases.