TL;DR
Play games included with Prime
Start a Prime free trial and play with Amazon Luna on your devices.
Start playingAs an affiliate, we earn on qualifying purchases.
Proper cable management in a field bag speeds up setup and reduces tangles. Using dedicated compartments, labels, and wraps keeps gear protected and ready for action.
Imagine arriving on a busy location, gear in hand, ready to record. You reach into your bag, and chaos greets you—snarled cables, tangled connectors, and a frantic search for that one adapter. This chaos isn’t just annoying; it’s a setup killer.
In fast-paced recording situations, how you organize your field bag’s cable layout can make or break your day. A clean, efficient system minimizes setup time, protects your gear from damage, and keeps you focused on capturing the perfect sound. Today, you’ll learn practical tips to master cable management—so you’re always ready to roll, no matter how hectic the shoot.
Use dedicated, labeled pouches for each cable type to speed up setup and troubleshooting.
Coil cables with the over-under method to prevent twists and damage during transport.
Invest in or DIY cable management accessories like velcro straps and specialized pouches for a tidy kit.
Choose bags with built-in cable channels, padded compartments, and quick-access pockets to streamline your workflow.
Maintain your cable system by regular inspection and consistent organization after each shoot.
Field Bag Layout:
Cable Management for Run-and-Gun Audio
Snarled cables and frantic adapter hunts are setup killers. A disciplined cable layout — dedicated compartments, color-coded labels, and proper coiling — protects your gear and gets you rolling in seconds, no matter how hectic the shoot.
Organize Cables for Lightning-Fast Setup
Dedicated Pouches
One labeled pouch per cable type — XLRs, TRS, power cords, adapters. Each cable has its place, so a quick glance tells you exactly where everything is. No fumbling, no guesswork.
Over-Under Coiling
Alternate the direction of each loop when coiling. This prevents twists and kinks that damage insulation, and keeps cables deployment-ready at a moment’s notice.
Velcro Straps
Secure every coil with quick-release velcro or reusable ties — never tight knots that strain conductors. Adjustable straps mean fast release and re-coiling during tear-down.
The Color-Code System
Traditional Bag vs. Modern Audio Bag
| Feature | Traditional Bag | Modern Audio Bag |
|---|---|---|
| Cable compartments | Small, generic pockets | Dedicated, padded pouches with labels |
| Built-in cable channels | Rare or nonexistent | Common, customizable channels |
| Material quality | Basic nylon or canvas | Waterproof, ballistic nylon, or lightweight composites |
| Accessibility | Limited — often requires digging | Quick-access pockets and modular design |
Coil and Store Without Tangles
Flat Surface
Lay the cable straight on a clean surface, avoiding kinks and twists that set the foundation for a bad coil.
Over-Under
Make a loop, then alternate direction on each subsequent loop. This preserves flexibility and longevity.
Secure
Fasten with a velcro strap or reusable tie. Skip tight knots that cause internal damage over time.
Label & Store
Place the coil in its labeled pouch. Quick ID of type and length streamlines busy shoots.
Group & Repeat
Keep similar cables together. Consistency minimizes lost or damaged gear across shoots.
Time Saved on Every Shoot
Pro upgrade: RFID tags or QR codes on cables and accessories streamline inventory across multiple shoots and gear changes — reducing the risk of missing items or using damaged cables. Even DIY solutions like repurposed pencil cases with elastic loops get the job done.
How to Organize Your Cables for Lightning-Fast Setup
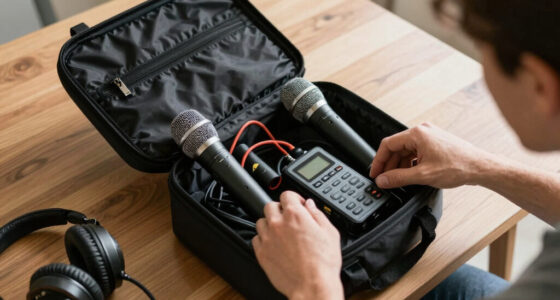
The first step in effective cable management is dedicated organization. Think of your bag as a well-oiled machine—each cable has its place. Use separate pouches or compartments for each cable type: XLRs, TRS, power cords, adapters.
Label each pouch clearly with a marker or color coding. For example, red for power, blue for audio, green for adapters. When you’re in a pinch, a quick glance tells you exactly where everything is—no fumbling or guesswork.
Coiling cables properly is also key. Use the over-under method—this prevents twists and kinks that can damage cable insulation. Secure each coil with velcro straps or reusable cable ties. This keeps cables neat and tangle-free, ready for deployment at a moment’s notice.
Here’s a simple setup: a small pouch for XLR cables, another for TRS, a separate one for power cords, and a quick-access pocket for adapters or small accessories. This layout minimizes digging through your bag and speeds up your workflow.
Why is this important? Proper organization reduces the time spent searching for the right cable, which is crucial when every second counts. It also prevents accidental damage caused by tangled or improperly stored cables, ultimately extending the lifespan of your gear. A well-organized system ensures that when you need to troubleshoot or swap equipment, you can do so swiftly and confidently, avoiding costly delays.
As an affiliate, we earn on qualifying purchases.
The Best Cable Management Accessories That Save Time and Headaches
In recent years, new accessories have made cable management in the field way easier. Modular pouches with built-in cable wraps, quick-release velcro straps, and cable sleeves help keep everything tidy.
For example, a popular choice is a dedicated cable wrap with multiple slots for individual cords. Wrap each cable, then slide it into the pouch—no tangling, no fuss. These accessories are designed to reduce the time spent unwinding and sorting cables, which can be a significant bottleneck during quick setups. Some pouches even have elastic loops or dedicated channels that keep cables separated and prevent cross-tangling during transport.
Another smart trick: RFID tags or QR codes on cables and accessories. This helps you keep track of what’s what, especially when juggling multiple shoots and gear changes. It streamlines inventory management and ensures you’re always aware of your gear’s status, reducing the risk of missing essential items or using damaged cables.
Investing in these accessories doesn’t have to break the bank. Even DIY solutions, like repurposed pencil cases with elastic loops or velcro strips, can be customized to your needs. The key is choosing tools that enhance your workflow, reduce setup time, and improve the longevity and safety of your cables and gear.
velcro cable straps for audio equipment
As an affiliate, we earn on qualifying purchases.
As an affiliate, we earn on qualifying purchases.
Compare Bag Features: Which Design Makes Cable Management Easier?
| Feature | Traditional Bag | Modern Audio Bag |
|---|---|---|
| Cable compartments | Small, generic pockets | Dedicated, padded pouches with labels |
| Built-in cable channels | Rare or nonexistent | Common, customizable channels |
| Material quality | Basic nylon or canvas | Waterproof, ballistic nylon, or lightweight composites |
| Accessibility | Limited, often requires digging | Quick-access pockets and modular design |
Choosing a bag with dedicated cable compartments, padded sections, and quick-access pockets can significantly improve your setup speed. These features aren’t just about convenience—they influence how quickly you can respond to changing conditions on set. A bag with well-thought-out cable management options reduces the need to unpack everything when troubleshooting or swapping gear. It minimizes the risk of accidental damage during transit and makes your overall workflow more efficient. Think of it as upgrading from a cluttered toolbox to a precision-engineered storage system designed specifically for the demands of field audio work.
As an affiliate, we earn on qualifying purchases.
Step-by-Step: How to Coil and Store Your Cables Without Tangles
- Start with a clean, flat surface. Lay your cable straight, avoiding kinks or twists. This initial step is crucial because it sets the foundation for a tangle-free coil. Damaged or twisted cables are more prone to failure, so gentle handling matters.
- Use the over-under method: make a loop, then alternate the direction of each subsequent loop. This technique not only prevents twists but also ensures the cable retains its flexibility and longevity. Proper coiling reduces stress on the cable insulation and connectors, extending their lifespan.
- Secure the coil with a velcro strap or reusable tie, avoiding tight knots that could strain the cable. Tight knots can cause internal damage or weaken the cable over time. Using adjustable straps allows for quick release and re-coiling, saving valuable time during setup or tear-down.
- Store the coiled cable in a labeled pouch or designated compartment. Proper storage prevents accidental pulls or crushing. Labeling helps you quickly identify the cable type or length, streamlining your workflow on busy shoots.
- Repeat for each cable, keeping similar types together for easy identification. Grouping related cables saves time during setup and troubleshooting, reducing stress and increasing efficiency. Over time, this disciplined approach minimizes the chances of misplacing or damaging your gear, ensuring reliability when you need it most.
This simple process, when done consistently, can dramatically decrease setup time, prevent damage from improper handling, and keep your gear ready for immediate use. It transforms a chaotic tangle into a predictable, manageable system—saving you from the frustration and delays of untangling spaghetti on location.
As an affiliate, we earn on qualifying purchases.
Conclusion
Mastering cable management in your field bag isn’t just about tidiness—it’s about efficiency, protection, and peace of mind during a shoot. A little prep and organization go a long way in saving time and avoiding last-minute chaos.
Next time you pack your gear, think of your bag as a well-oiled tool. Your setup will be faster, your gear safer, and your mind clearer—ready for whatever the day throws at you.
Fall yard work Picks
leaf blowers
As an affiliate, we earn on qualifying purchases.