TL;DR

Get audio and creator gear delivered free — and shop member deals
- Fast, free delivery on millions of items
- Access to Prime Big Deal Days deals on October 6–7
- Prime Video, Amazon Music and more included
Asymmetric rooms and sloped ceilings aren’t inherently bad. The key is measuring and treating specific reflection points, controlling bass issues, and focusing on symmetry around your listening position for the best results.
Most studio owners think symmetry is king. But what if your room isn’t rectangular? Or if the ceiling slopes at odd angles? It turns out, these irregularities aren’t necessarily a problem—they can even help. The secret lies in understanding how sound behaves in these spaces and using measurement to guide your treatment decisions.
This guide will show you how to make asymmetric rooms and sloped ceilings work for you, not against you. You’ll learn how to identify the real acoustic issues, treat them effectively, and avoid common pitfalls. Whether you’re building a new studio or fixing one that’s already there, these practical tips will help you get a cleaner, more balanced sound.
Aim for symmetry around your listening position, even if the room itself is irregular.
Identify and treat early reflection points separately for each speaker, using measurements to confirm.
Use deep broadband traps at corners and junctions to control bass modes—thin foam isn’t enough for serious low-frequency issues.
Measure often: small microphone moves can dramatically change bass nulls and peaks, guiding your treatment choices.
Treat the room based on sound behavior, not just visual symmetry or appearance. Flexibility and measurement are your best tools.
Studio Acoustics / Field Guide
Treating Asymmetric Rooms and Sloped Ceilings
Irregular geometry is not automatically an acoustic flaw. Nonparallel surfaces can reduce flutter echo and distribute reflections—but they also make prediction harder. Build symmetry around the listening position, investigate each reflection path, and let measurements determine the treatment.
01 / The acoustic priorities
Create a balanced listening zone inside an irregular shell
The geometric center of the room may not be the best acoustic center. Test speaker and chair locations first, then balance the sound reaching each ear.
Center the listener
Keep both speakers equidistant from the listening position with matching height and toe-in. Even a small lateral shift can destabilize imaging.
Goal: equal direct paths and similar boundary effects
Balance each side
A close wall and an open alcove require different solutions. Change absorber depth, position, or surface type until reflection energy is comparable.
Toolbox: panels, curtains, shelving, gobos
Map left and right separately
Use the mirror method as a starting point, then inspect impulse-response data to confirm which wall or ceiling paths actually need treatment.
Target: strong arrivals within the first 20 ms
Follow the energy
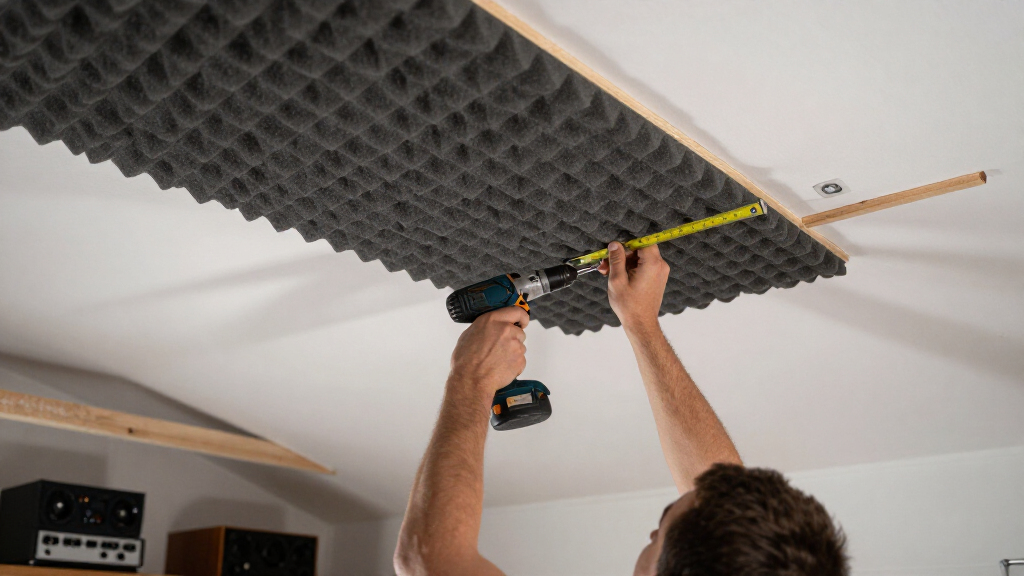
A slope can direct reflections away from the listener or focus them directly toward the mix position. Cloud orientation should follow the measured path.
Air gaps extend absorber effectiveness downward
Treat bass in 3D
Irregular geometry shifts room modes; it does not remove them. Test several microphone positions and prioritize corners, junctions, and large boundaries.
Thin foam cannot control serious bass problems
Move, measure, repeat
Small microphone, speaker, or chair moves can transform a bass peak or null. Compare repeatable measurements before committing to permanent treatment.
Decision rule: evidence before installation
02 / Step-by-step workflow
From strange geometry to a reliable monitoring position
Solve placement and low-frequency behavior before covering the room with high-frequency absorption.
Set the room’s purpose: mixing, mastering, recording, or casual listening.
Test symmetrical speaker and listener layouts rather than assuming the visual center.
Capture frequency response, decay, and impulse data at several nearby positions.
Install deep bass control, then target side-wall and ceiling reflections independently.
Remeasure, listen with references, and adjust panel depth, angle, or location.
Speaker placement → listening position → bass control → early reflections → diffusion and finishing adjustments.
03 / Choose the right tool
Treatment methods are not interchangeable
Match the device to the acoustic problem. Broadband absorption is the dependable default; deep bass issues demand depth, volume, or tuned systems.
| Method | Early reflections | Deep bass | Irregular spaces | Placement note |
|---|---|---|---|---|
| Broadband absorber | ✓ Strong | ~ With depth | ✓ Flexible | Side walls, cloud, boundaries |
| Deep corner trap | ~ Helpful | ✓ Strong | ✓ Flexible | Corners and ceiling junctions |
| Thin acoustic foam | ~ Highs only | ✗ Weak | ~ Limited | Avoid as a bass solution |
| Diffuser | ~ Contextual | ✗ Weak | ~ Needs distance | Prefer 2 m or more clearance |
| Multiple subwoofers | ✗ Unrelated | ✓ Strong | ✓ Adaptable | Position and align carefully |
| Tuned resonant trap | ✗ Narrow use | ✓ Targeted | ~ Data-led | Use for confirmed modal issues |
Decision weight
Relative importance when planning an irregular critical-listening room.
04 / Placement map
Treat pressure zones and reflection paths—not every surface
Concentrate material where it changes the response. Preserve some reflective life so the room remains useful and natural.
High-value locations
- Side-reflection points: locate separately for each speaker.
- Ceiling path: add a cloud when the slope redirects energy toward the listener.
- Corners and junctions: use the deepest broadband trapping the room permits.
- Front and rear boundaries: investigate strong reflections and long decay.
- Knee walls and cavities: exploit available depth for low-frequency absorption.
Common mistakes
- Copying panel positions: matching visually while reflection paths remain unequal.
- Overusing thin foam: removing treble while bass peaks and nulls remain.
- Ignoring the slope: assuming nonparallel automatically means beneficial.
- Diffusing too close: using scattering devices without enough listening distance.
- Measuring once: missing large response changes only centimeters away.
The winning principle: maximize symmetry around the listener, then customize everything else to the room’s measured behavior.
Why Symmetry Still Matters in an Irregular Room
Even in rooms with sloped ceilings or uneven walls, aiming for symmetry around your listening position makes a huge difference. Why? Because your ears and brain crave a balanced sound stage. When the distances, reflections, and boundary effects are similar on both sides, stereo imaging stays stable and precise.
Imagine sitting in a room where your left and right speakers are equidistant from your ears. The early reflections from walls and ceiling hit at similar times and intensities. This consistency keeps your stereo image tight and your tonal balance even. When this isn’t the case, your mixes can sound skewed or unfocused.
For instance, if the left wall is close and reflective but the right is a deep alcove, your sound will be uneven. To fix this, measure your space and adjust speaker and listener placement to maximize symmetry. Small shifts—just a few inches—can dramatically improve clarity and imaging.
studio acoustic treatment panels for sloped ceilings
As an affiliate, we earn on qualifying purchases.
As an affiliate, we earn on qualifying purchases.
Treat Acoustic Symmetry, Not Just Visual Balance
Matching panels and treatment on both sides can seem logical, but in asymmetric rooms, it often misses the mark. Your goal is to balance how sound reaches each ear, not just how the room looks. One side might be a flat wall, while the other has an opening or a sloped surface that scatters or reflects differently.
For example, if the left side has a large window with curtains, you might need a thicker or larger absorber on that side to compensate for the extra reflections. Conversely, a bare wall on the right might need less treatment or even some diffusion to break up strong echoes.
Adjustments could mean using a thicker panel, positioning a freestanding absorber differently, or adding shelving or curtains that control reflections. Broadband absorption works best here—covering a wide frequency range—because it’s more predictable across the spectrum.
In practice, measure each side’s reflections and tailor your treatment. This approach prevents over-treating or creating new problems from mismatched acoustics.
bass traps for irregular room shapes
As an affiliate, we earn on qualifying purchases.
As an affiliate, we earn on qualifying purchases.
Pinpoint and Tackle Early Reflections for Clarity
Early reflections are sound bouncing off surfaces and reaching your ears within 20 milliseconds of the direct sound. They blur stereo imaging and can muddy your tonal balance. In asymmetric rooms, these reflections come from different directions and intensities, making treatment trickier but even more critical.
To find the main reflection points, use the mirror trick: sit in your listening position, move a mirror along the walls, and note where you see the speakers reflected. These spots are where you want to place absorbers or diffusers.
For example, if the mirror test shows strong reflections from the sloped ceiling, consider mounting broadband absorption or a ceiling cloud that intercepts that energy. Confirm with measurements—impulse responses and spectral analysis—to ensure you’re reducing the early reflections that distort your stereo image.
Addressing these points can instantly improve clarity and make your mixes sound more natural and centered.
measurement microphone for room acoustics
As an affiliate, we earn on qualifying purchases.
As an affiliate, we earn on qualifying purchases.
How Sloped Ceilings Change Reflection Paths and Treatment
Sloped ceilings alter how sound waves travel and reflect. Instead of bouncing straight down or across, they are redirected, which can be both a blessing and a curse. Properly oriented, a slope can direct reflections away from your listening position, reducing flutter echoes and standing waves.
For example, a ceiling sloped at 15° away from the listening area can prevent high-frequency echoes from bouncing directly back, giving your room a cleaner sound. But if the slope directs energy toward your ears—especially at certain frequencies—it can cause focused reflections or boomy spots.
Use a ceiling cloud—mounted at the right angle—to intercept problematic reflections. It doesn’t have to follow the exact slope; what matters is targeting the main reflection paths. An air gap behind the absorber enhances low-frequency performance, especially if the ceiling is low or the slope is steep.
Measurement and listening tests will tell you whether the slope helps or hurts your sound. Adjust the positioning and angle of treatment until you find the sweet spot.
sound reflection control panels for asymmetric rooms
As an affiliate, we earn on qualifying purchases.
As an affiliate, we earn on qualifying purchases.
Controlling Bass in a Room with Weird Geometry
Bass is tricky in irregular rooms because the modes—standing wave patterns—shift with the space’s shape. Sloped ceilings and asymmetric walls change the frequency and location of bass peaks and nulls, but don’t eliminate them.
For instance, a room with a 10° slope may push certain modes into higher or lower frequencies, but you’ll still get boomy spots or dead nulls if you don’t treat them.
Start by testing your bass response with a measurement microphone at multiple positions. Use thick broadband traps in corners, wall-ceiling junctions, and behind large objects. Multiple subwoofers, placed and tuned carefully, can help even out bass response across the room.
Remember: foam panels won’t fix deep bass problems—those require significant depth or tuned devices. Address bass issues early, before adding high-frequency treatments, to keep your room balanced across the spectrum.
Where to Place Absorbers, Diffusers, and Bass Traps in Irregular Spaces
In asymmetric rooms or with sloped ceilings, treatment locations aren’t always obvious. Focus on areas where sound pressure is highest—corners, wall-ceiling junctions, and behind furniture. These are often the best spots for bass traps and broadband absorbers.
For example, a knee wall with a steep slope creates a cavity that traps low frequencies. Installing a deep broadband panel there can tame stubborn resonances. Similarly, spaces behind freestanding panels or in deep recesses can be effective for targeted treatment.
Diffusers need space and distance—at least 2 meters—so avoid placing them too close to the listening position in small or irregular rooms. Use measurement tools to identify the most troublesome frequencies and place treatment accordingly.
Think of your room as a landscape: treat the peaks and nulls directly, rather than covering every surface indiscriminately.
Measurement: Your Best Friend in Complex Spaces
In irregular rooms, guesswork can lead you astray. Measuring your space with a calibrated microphone reveals exactly where the problems lie. Use frequency response, impulse, and waterfall plots to see how sound behaves across the spectrum.
For example, if a null appears at 80Hz only when you sit in one spot, moving your listening position slightly might solve the issue. Measurements show whether your treatment is working or if you need to reposition panels or add traps.
Small microphone movements—just a few inches—can dramatically change bass nulls or peaks. Take your time measuring from multiple seats and angles. This data guides your decisions, saving you from unnecessary or ineffective treatments.
Tools like REW (Room EQ Wizard) make this process accessible and straightforward, turning guesswork into science.
Step-by-Step: Making Your Asymmetric Room Sound Better
- Define your room’s purpose: mixing, mastering, recording, or casual listening.
- Place your speakers and listening position before fixing treatments; measure and listen.
- Identify primary early reflection points with a mirror or measurement software.
- Install broadband absorption at these reflection points—side walls, ceiling, and behind the speakers.
- Address bass issues with deep traps in corners, wall-ceiling junctions, and dedicated subwoofer placement.
- Use measurements to verify improvements, adjusting positions as needed.
- Add diffusion or scatterers only after controlling the main issues—bass and early reflections.
- Re-measure and listen again. Fine-tune your setup for the most natural, balanced sound.
This iterative process keeps your treatment practical and effective, no matter how irregular your space.
How to Decide the Best Orientation for a Sloped Ceiling
The direction your slope faces impacts how sound bounces and where reflections focus. There’s no one-size-fits-all, but consider these factors:
- Does the slope direct reflections toward your listening position? If yes, you might want to treat that area.
- Is there enough headroom to mount absorbers or clouds? More height means more options.
- Measure bass response at different angles and positions. The best orientation minimizes peaks and nulls.
- Check practical concerns: speaker placement, safety, and ease of access.
For example, a 20° slope that faces away from your listening spot can diffuse reflections and reduce flutter echoes. Use measurements to confirm whether the orientation helps or hinders your sound quality.
Control Room vs. Recording Space: Different Goals, Different Treatments
Control rooms prioritize accurate stereo imaging, early reflection control, and tight bass. Recording spaces, however, benefit from spatial variation and some lively energy. The treatment strategies differ accordingly.
For control rooms, focus on symmetrical placement of absorption and diffusion, reducing early reflections, and minimizing modal issues. For recording rooms, you can afford to leave some reflections, use movable gobos, and incorporate angled or reflective surfaces to create a sense of space.
For example, a sloped ceiling in a control room might be flattened or treated to prevent focused reflections, while in a recording space, the slope can add character or help with spatial imaging.
Ultimately, balancing these aims requires flexibility and often movable treatments, especially in spaces that serve multiple functions.
Common Pitfalls to Avoid When Treating Irregular Rooms
Many owners assume irregular geometry automatically solves standing wave issues. It doesn’t. Deep nulls and peaks still occur if you don’t measure and treat properly.
Other mistakes include installing treatment without measuring first, overusing thin foam for bass control, or covering every surface and making the room dead at high frequencies. Don’t forget doors, windows, or furniture—these affect acoustics too.
And avoid mounting panels flush against walls without an air gap. This can seriously reduce low-frequency absorption. Always test before committing to permanent solutions.
Remember, treatment should be guided by measurement, not just appearance or assumptions about irregularity.
Future Trends in Handling Complex Rooms
Modern room treatment leans heavily on measurement and digital tools. Affordable calibrated microphones, room analysis software, and automated optimization make it easier to tune irregular spaces.
Multi-subwoofer systems and active bass control are increasingly common, helping smooth out bass nulls and peaks. Hybrid panels combining absorption, diffusion, and aesthetic finishes are also gaining popularity.
Advanced modeling, ray tracing, and CNC-cut custom panels allow for treatment tailored precisely to your room’s unique geometry. These innovations put professional-grade acoustics within reach, even on tight budgets.
While digital correction can refine sound, it’s no substitute for physical treatment—measure first, treat second, then use correction as a final touch.
Frequently Asked Questions
Is an asymmetric room bad for mixing?
Not inherently. The main challenge is uneven early reflections and boundary effects. Proper speaker placement, measurement, and side-specific treatment can make an asymmetric room work well for mixing.
Are sloped ceilings good for acoustics?
They can reduce flutter echoes and modal issues, but may also redirect or focus reflections. Effectiveness depends on the slope angle, surface materials, and how you treat the space.
Should acoustic panels be installed symmetrically?
Not always. The goal is balanced sound around your listening position. Treatment may need to be asymmetric to compensate for room irregularities.
Where should I place bass traps in a room with an unusual shape?
Focus on corners, wall-ceiling junctions, and deep recesses. Use measurements to identify the worst frequency areas and treat those hotspots first.
Can I fix my room’s acoustics with just digital correction?
Digital correction helps, but it can’t replace physical treatment of early reflections and bass mode issues. Use measurement-guided physical treatment as your foundation, then fine-tune with software.
Conclusion
Irregular rooms and sloped ceilings don’t have to be acoustic nightmares. With careful measurement and targeted treatment, you can tame their quirks and achieve a balanced, clear sound.
Remember: focus on the specific reflection points, control bass deeply, and keep listening tests central. Your room’s unique shape can become an advantage, not a barrier—if you treat it smartly.
Evergreen bestsellers Picks
bestsellers
As an affiliate, we earn on qualifying purchases.