
TL;DR

Get audio and creator gear delivered free with Prime
- Fast, free delivery on millions of items
- Prime Video, Amazon Music and more included
- Member-only deals all year
Cold weather can reduce battery performance, but the biggest moisture risk often arrives when cold gear enters warm, humid air. Keep spare power warm, seal equipment before bringing it indoors, and choose wind protection by listening to a test recording rather than trusting appearances. Check each device’s temperature limits and test the complete setup before an important outing.
A recorder can run happily in freezing air, then face its biggest moisture risk at the front door. That surprise catches many winter recordists: the outdoor take sounds fine, but warm air meets cold gear and leaves dampness where you can’t see it.
Cold-weather recording is less about finding a special winter setting and more about managing three interacting problems: battery performance, moisture from temperature changes, and wind at the microphone. Each can spoil a session in a different way. Wind can bury quiet ambience under bass-heavy rumble; cold can make a battery warning arrive early; and a quick trip indoors can put equipment at risk.
This guide gives you a practical routine for power, protection, placement, and the return indoors. You’ll learn what to test before leaving, what to listen for outside, and what to do when you get home—without treating expensive gear as the only answer.
Check temperature limits for the recorder, microphone, batteries, and accessories; the weakest-rated part sets the practical boundary.
Keep spare batteries warm and protected, and test the exact battery type in conditions like the outing.
Seal cold equipment before bringing it into warm air, then wait until it nears room temperature before opening the bag.
Use wind protection suited to the location, record a test, and listen on headphones before committing to a long take.
Treat placement and prevention as your first tools: severe wind buffeting often cannot be repaired cleanly in editing.
Cold Weather Field Recording Power, moisture and wind
Cold can shorten battery life, but the biggest moisture risk often comes when cold gear enters warm, humid air. Prepare for each transition and test your complete setup before an important outing.
Three risks, one plan
Power, moisture and wind can each spoil a take or force rushed adjustments in difficult conditions.
Cold reduces capacity
A battery warning may arrive early. Test the exact battery type and keep protected spares warm and dry.
Transitions matter
Seal cold equipment before entering warm air, then let it warm before opening the bag.
Protect the capsule
Wind can overwhelm quiet sounds with bass-heavy rumble that may be difficult to repair later.
Prepare for dependable power
Check every part of the setup: the least cold-tolerant device sets the practical limit.
Review guidance for the recorder, microphone, batteries, cables and external power.
Record in conditions like the outing; do not rely only on a full-battery icon.
Carry protected batteries in an inside pocket, away from metal objects.
Check remaining time at natural pauses because cold can make battery estimates less reliable.
Choose wind protection by conditions
Record a test and listen on headphones before committing to a long take.
| Conditions | Protection to consider | What to check |
|---|---|---|
| Light breeze | Foam windscreen | Listen for wind reaching the capsule |
| Stronger wind | Furry wind cover | Check the test recording on headphones |
| Very exposed conditions | Blimp or basket with furry cover | Choose a setup supported by the microphone |
Make the return indoors safer
Condensation forms when warm, moist air meets a colder surface—not simply because equipment is cold.
- Put cold gear in a sealed plastic bag or dry case.
- Keep the recorder powered off during the transition.
- Avoid breathing directly onto microphones, connectors or screens.
- Let the equipment warm gradually while sealed.
- Wait until it nears room temperature before opening the bag.
- If gear gets wet, power it down and follow manufacturer drying guidance.
Why winter recordings need a three-part plan
Cold weather field recording works best when you plan for power, moisture, and wind together, rather than treating each as a separate surprise. These risks interact because a problem in one area often forces a decision that increases another risk. A battery warning, for instance, may prompt you to open the recorder outdoors; doing that in blowing snow exposes its contacts and controls to moisture just when cold hands make the task harder.
Think of the outing as a chain: gear leaves a warm room, records in cold air, then returns to warmth. Conditions change at each transition, so preparation is not just about whether the recorder can operate outside. It is also about keeping power available without unnecessary handling, limiting wind before it reaches the capsule, and preventing condensation during the return indoors. A simple plan reduces the number of rushed adjustments that can cause missed takes or equipment trouble.
Winter also changes what you hear. Fresh snow can soften footsteps and absorb some high-frequency sound, while wind in bare branches or around a building can create a low, restless wash. The contrast matters: you may expect a dramatic sound from falling snow but capture mostly wind, clothing movement, or distant traffic. If you’re making a weather field recording, listen for how the weather interacts with the place, rather than assuming the most visible part of the scene will dominate the recording.
Before you go, decide what matters most in the take. If you want quiet snow settling in a sheltered garden, minimize handling and protect the microphone from small gusts, because even modest buffeting can mask delicate details. If you want the rough sound of a storm, some wind may be part of the subject, but uncontrolled rumble can still overwhelm it. Keep the recorder and your own footing safe; a dramatic recording is not worth standing under an unstable branch.
Popular right now

Dreame G10 Pro Wet-Dry Vacuum Mop

De'Longhi La Specialista Opera Espresso Machine with Coffee Grinder

Sony WH-1000XM6 Wireless Noise-Canceling Headphones, Black
As an affiliate, we earn on qualifying purchases.
Keep your recorder running when the temperature drops
Cold can reduce a battery’s usable capacity and make its voltage sag, so a recorder may show a low warning or shut down sooner than its indoor test suggests. This matters beyond the inconvenience of a dead recorder: a shutdown can interrupt a long ambience take, leave you with no reference recording, or force a battery change in wet or windy conditions. The battery can recover some performance after warming, but you should not plan a session around that possibility; your device’s approved battery types and temperature limits matter more than a generic rule.
As a practical starting point, check the operating range for the recorder, microphone, batteries, cables, and any external power supply. The full setup is only as dependable as its least tolerant component. For example, a recorder may be rated for cold operation while an external power bank is not; relying on that bank can create a failure point even if the recorder itself is within spec. A device marked weather-resistant is not automatically rated for freezing temperatures, falling snow, or a humid indoor-to-outdoor change.
Lithium primary cells often retain cold-weather performance better than alkaline cells, but compatibility comes first. Rechargeable lithium-ion packs can also lose capacity in the cold. If your recorder accepts several options, test the exact type you plan to use in similar conditions and time a real recording, rather than relying on a reassuring full-battery icon. The goal is not to identify a universally best battery, but to learn how much dependable recording time your particular combination provides.
Keep spares warm and dry in an inside pocket, not loose beside keys or coins. Warm spares are more useful because cold reduces available output, while protection from metal objects avoids short circuits. A small insulated pouch can help keep the recorder warmer, but don’t block vents or wrap it so tightly that moisture gets trapped. For a 90-minute dawn session, carry a tested spare and check the remaining time at natural pauses; cold makes battery estimates less dependable. Balance frequent checks against the risk of opening the case and handling controls in poor conditions.
- Charge and test the batteries before the trip.
- Carry protected spares close to your body.
- Check the full setup’s limits, including accessories and external power.
- Watch the recording time, not only the battery icon.
Stop indoor condensation before it reaches your gear
Condensation forms when warm, moist air meets a colder surface, so the risky moment often comes after recording, when you bring cold gear indoors. Cold itself is not condensation. The trouble starts when moisture in the surrounding air settles on a cold recorder, connector, or microphone capsule. That moisture may be hard to see, yet it can affect electrical contacts, collect inside openings, or leave a capsule damp enough to compromise its next recording.
Before you enter a warm building, put the cold equipment in a sealed plastic bag or dry case. Let it warm gradually while sealed; that gives moisture a better chance of forming on the outside of the bag rather than on the equipment. The seal limits the fresh humid air reaching the cold surfaces, which is why placing the gear in a bag after it has already warmed in the room is too late. Keep the recorder powered off during the change, and avoid breathing directly onto a cold microphone or screen.
There is no reliable universal waiting time. A compact recorder may warm faster than a heavy microphone and basket, and a large temperature difference or humid room can stretch the process. Wait until the equipment is near room temperature and the outside of the bag no longer feels cold. Opening early defeats the protection by letting warm room air reach surfaces that may still be cold. If you are returning from a long, freezing session with a bulky rig, give it more time than a quick glance suggests.
Silica-gel packets can help dry a storage space, but they do not replace careful temperature transitions: desiccant can absorb some moisture, yet it cannot prevent humid air from immediately contacting a cold surface when the bag is opened. If gear gets wet, switch it off and follow the manufacturer’s drying guidance. Don’t power it on to see whether it survived: electricity and damp connectors are a poor test combination.
Cold is not the same as condensation. The key risk is moisture meeting equipment at the wrong temperature, especially when you move between outdoor cold and indoor warmth.
Choose wind protection by listening, not guessing
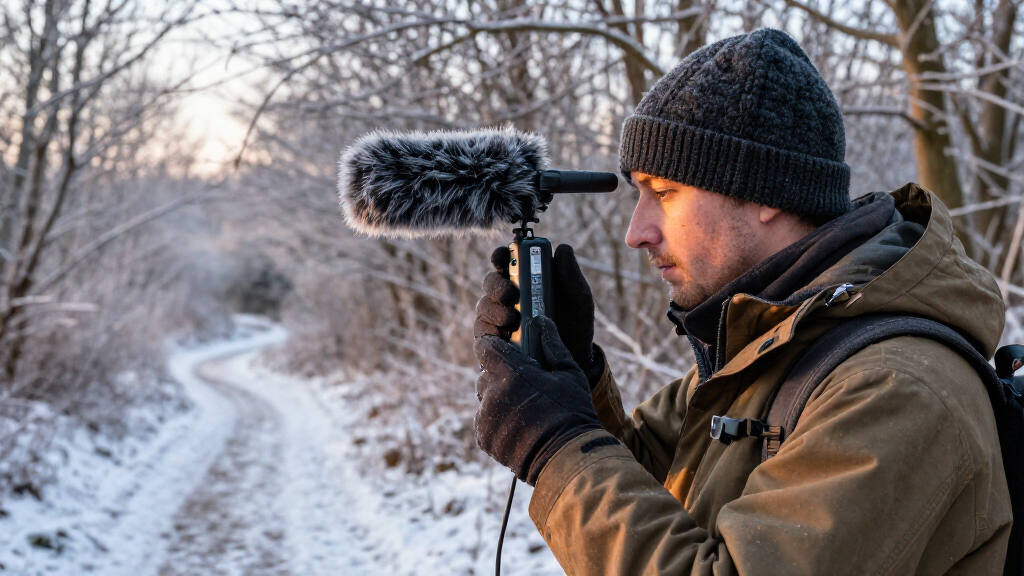
Wind protection stops moving air from overwhelming the microphone capsule; the right choice depends on wind strength, microphone design, and the sound you want to keep. Wind hitting the capsule creates pressure changes that can overwhelm the wanted sound, especially at low frequencies. The tradeoff is that more protection usually adds bulk, can affect high-frequency detail, and may itself rustle or catch the wind. A foam cover may be enough for a light breeze, while an exposed ridge or open shoreline can call for a furry cover or a basket system.
Wind often arrives in the recording as a heavy, irregular rumble. That low-frequency buffeting can bury birds, footsteps, or the delicate tick of snow on a jacket, and severe distortion is difficult to repair afterward because the wanted sound has already been masked or clipped. A low-cut filter may reduce rumble, but it can also thin wanted sounds such as distant thunder, machinery, or the deep hush of a winter landscape. Filtering can improve clarity only when the removed bass is less important than the sound you want to preserve.
| Conditions | Protection to try | What to listen for |
|---|---|---|
| Light breeze, sheltered spot | Foam windscreen | Soft low-end flutter on gusts |
| Steady outdoor wind | Furry cover matched to the microphone | Buffeting, rustle, or cover noise |
| Exposed, gusty location | Basket or blimp with a furry cover | Low rumble and turbulent blasts |
These are starting points, not guarantees. Fit the protection before leaving shelter, then record a short test and listen on headphones. A furry cover that looks substantial may still transmit gusts in an open field, while a wall can create turbulence that sounds rougher than the wind in the open. Listening to the actual recording reveals both failures: insufficient protection produces rumble, while loose or poorly fitted material can add its own rustle.
Try a natural windbreak—a building, vehicle, or rise in the terrain—but check that it does not introduce its own noise. Aim away from direct wind when that suits the microphone, but don’t expect orientation alone to solve a gust. For example, if a gust rumbles through your headphones each time you turn toward a frozen pond, change position or add protection before recording the full ambience. A test gives you a chance to trade a little convenience for a cleaner take, instead of discovering after the session that the chosen position was unusable.
Follow this simple routine from packing to playback
A reliable winter routine has seven steps: check limits, prepare power, fit protection, control handling noise, monitor, warm the gear gradually, and back up. The order matters. Preparing in shelter reduces fiddly outdoor adjustments, and the return routine protects the equipment after the recording is finished. Doing the small jobs in shelter saves cold fingers and rushed decisions outside.
- Check operating limits. Read the ratings for the recorder, microphone, batteries, cables, and accessories. If the outing falls outside a stated range, don’t assume a warm pocket fixes every part of the system. A cable or power source outside its rated conditions can still undermine an otherwise suitable recorder.
- Prepare power and storage. Charge batteries, pack warm spares, and leave room for retakes or longer takes. A short test at home confirms that your card, cable, and power setup work together, while a cold-weather test helps estimate realistic runtime.
- Fit wind protection before you leave. Tiny clips and elastic bands are awkward with cold hands. Pack the cover so it stays dry and ready to use. A cover that is wet or loose may add noise rather than solve it.
- Secure cables and connectors. Keep cables from rubbing a jacket or tapping a stand. Those little knocks can sound enormous in a quiet recording. Securing them also reduces the chance that a snag will shift the microphone or pull a connector loose.
- Record and listen to a test. Check for wind rumble, cable noise, crackling, and handling sounds in headphones. Meters show level; your ears catch the problem. A test is useful because the wind and reflections at the location may be quite different from what you heard while setting up indoors.
- Seal cold gear before going indoors. Let it warm in the bag or case, and wait until it is near room temperature before opening. This step limits humid air reaching cold equipment during the temperature transition.
- Inspect, label, and back up. Once the gear is safe to handle, note the location and conditions and copy important files to a second storage location. Notes help explain later why a take sounds different, and a backup protects work that may be difficult to recreate.
For instance, at a snowy park you might record a 20-second test behind a low wall, listen for wind hitting the furry cover, then move a few steps if the wall creates a hollow flutter. That quick check can save an hour of unusable takes. It also shows whether the compromise of the sheltered position is worth it: a slightly different perspective may preserve more of the quiet ambience than the exposed spot.
Make winter recordings cleaner without buying a new rig
You can improve many winter recordings with better placement, a test take, and careful handling before you spend money on another recorder. These changes address the point where unwanted sound enters the recording, which is often more effective than trying to repair it later. Newer portable recorders may offer USB-C power, power-bank support, app control, and high-resolution formats, but none of those features removes wind distortion or protects a cold connector from moisture.
External power can help during a long session, but a power bank and its cable have their own cold-weather limits. It may extend runtime while adding more connections and handling risks, so the benefit depends on whether a long uninterrupted take matters more than a simple, lightweight setup. A cable can snag, knock against the stand, or make a faint tapping sound in the take. Check the manufacturer’s instructions, keep connections sheltered, and test the whole arrangement outside before relying on it for a long recording.
Wind covers range from simple foam to compact baskets and blimps. A modest cover can be enough for a sheltered woodland path; an exposed coastal ledge asks more of the setup. Match protection to the actual location, and remember that bulkier gear can catch more wind or make a stand less stable. The best choice is therefore not automatically the largest cover: it is the lightest protection that controls the wind without adding distracting handling noise or making placement unsafe.
Software can reduce some steady low-frequency rumble, but it cannot reliably rebuild a signal that has been badly buffeted or clipped. A low-cut filter may clean up a traffic-side ambience where deep bass is unwanted; the same filter could strip body from a distant train or storm. Record a short test with the filter on and off when you can, then choose the version that preserves the sound you came for. Comparing versions makes the tradeoff audible instead of asking you to guess whether cleaner means better.
Before chasing higher resolution or a fancier recorder, ask what failed in the last take. If it was wind, improve the cover or position. If the recorder stopped, test power in the cold. If it dampened indoors, change the return routine. Fixing the cause often costs less than replacing the tool. More importantly, matching the fix to the failure avoids adding complexity that creates a new weak point.
Protect your hands, footing, and recording time
A good cold-weather plan protects you as well as your equipment: cold hands, poor footing, and worsening conditions can turn a simple recording into a rushed or unsafe one. Dexterity drops when you are chilled, making battery changes, small controls, and loose connectors harder to manage. Those difficulties also affect sound: fumbling can lead to handling noise, a dropped part, or a rushed setup that you did not have time to monitor properly.
Choose gloves that let you work the controls, or set up the recorder before you expose your hands. A stable stand matters in gusts, but a stand placed on ice can slide or topple. In a windy clearing, a low, secure setup may be safer than raising the microphone high to clear nearby obstacles. The practical tradeoff is between the position that best captures the sound and one you can keep stable without compromising your balance.
Have a clear plan for when to stop: a weather change, unsafe footing, wet equipment, or hands that no longer work well are good reasons to retreat. You can always return for another take. A recordist chasing a few extra minutes of ambience may miss a clear warning sign while watching the meters. Decide in advance what conditions would end the session so that a recording goal does not quietly become a reason to ignore deteriorating conditions.
For a practical example, imagine setting up beside a frozen creek. Keep the recorder and spare batteries in a protected bag, place the stand on firm ground away from the edge, and decide before recording which path you’ll use to leave. Good sound comes from a position you can hold safely, not from the most dramatic spot on the map. If the safest position changes the sound, that is a better compromise than risking a fall or losing control of the equipment.
Frequently Asked Questions
Can I use my recorder below freezing?
Possibly, but check the operating-temperature range for the exact recorder and its accessories. The microphone, battery, screen, or connectors may have different limits from the main unit. Test the complete setup in similar conditions before relying on it.
Which batteries work best in cold weather?
It depends on your recorder’s approved battery types. Lithium primary cells often retain cold-weather performance better than alkaline cells, while rechargeable packs vary and can lose capacity in the cold. Follow the device guidance and test the exact cells you plan to carry.
How do I stop condensation when I come indoors?
Before entering a warm space, seal cold equipment in a bag or dry case and let it warm gradually while closed. Wait until the gear is near room temperature before opening the bag. There is no single waiting time because equipment size, temperature difference, and humidity all matter.
Is a furry windscreen enough for strong wind?
Sometimes, but exposed or gusty locations may need a basket or blimp system with a furry cover. The microphone and the actual wind conditions matter, so record a test and listen on headphones. If the cover still produces heavy rumble, change position or add protection.
Can I fix wind noise in editing?
You can sometimes reduce steady low-frequency rumble with filtering or noise-reduction tools. Severe buffeting can distort the recording in ways software cannot cleanly repair. Prevention at the microphone—wind protection, placement, and a test take—is more dependable.
Should I use a low-cut filter outside?
Use one when unwanted low-frequency rumble matters more than the bass you want to preserve. It may help beside a gusty road, but it can thin out a storm, distant machinery, or other low sounds. If possible, record a short comparison with the filter on and off.
Conclusion
Remember the sequence: compatible power, protected microphone, gradual warming. Test the complete setup before an important outing, listen to a short take in the actual wind, and seal cold gear before you step indoors.
Winter sound can be wonderfully spare: a soft crunch, a branch creaking, wind combing through trees. Protect the recording—and yourself—so the quiet details make it home.