TL;DR

Get audio and creator gear delivered free with Prime
- Fast, free delivery on millions of items
- Prime Video, Amazon Music and more included
- Member-only deals all year
Clothing noise from lavaliers comes from fabric rubbing against the mic and cable. The key is strategic placement, secure mounting, and controlling fabric contact. Good technique beats expensive gear for clean, hidden audio.
Ever had a mic tucked under a shirt and heard that annoying rustle? It’s a common nightmare for anyone trying to get clean lavalier audio without drawing attention. The secret isn’t just in the gear — it’s in the placement and how you tame fabric noise.
If you want your audio to sound professional, you need to master the art of hiding the mic without creating a symphony of rustles. This guide covers proven techniques, real-world tips, and easy tricks to keep your lavs silent and invisible.
Clothing noise is mostly about how you mount and route the cable, not just the mic quality.
Use tape sandwiches and industry-standard overcovers to prevent fabric contact and rustle.
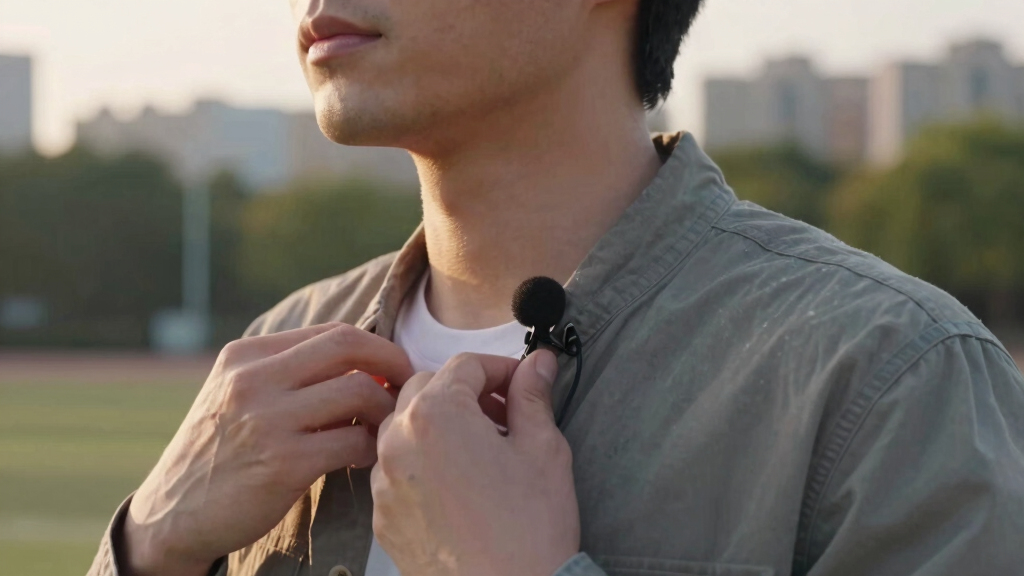
Place the lav 6–8 inches below the chin, centered for best visibility and sound consistency.
Match your concealment method to your wardrobe’s fabric to minimize noise and visibility.
Always perform a quick rustle test before recording to catch and fix issues early.
What Causes Clothing Noise and How to Stop It
Clothing noise isn’t about the mic itself — it’s about fabric, contact, and movement. When fabric rubs the mic capsule or cable, it creates that scratchy sound everyone dreads. The fix? Minimize fabric contact and control how the cable moves.
For example, if you tape a mic directly under a tight shirt, every breath and movement can cause noise. But if you create an air gap or secure the cable properly, you cut down the clang and rustle. According to an anonymous researcher, 80% of clothing noise issues come down to cable routing and fabric contact.
Understanding why this matters is crucial. Fabric contact causes micro-vibrations that are picked up as noise, which can be amplified during post-production or even during recording if not addressed. Over time, repeated contact can also cause wear on the mic or cable, reducing the lifespan of your equipment. The tradeoff is often between concealment and accessibility; the more you hide the mic, the more careful you need to be with placement and cable management to prevent noise.
lavalier microphone concealment tape
As an affiliate, we earn on qualifying purchases.
As an affiliate, we earn on qualifying purchases.
3 Proven Techniques to Hide a Lav Without Rustle
Here are three reliable ways to conceal your lavalier and keep noise to a minimum:
- Tape Sandwich / ‘Mummy’ Method: Wrap the mic in medical or moleskin tape, leaving a tiny air gap over the capsule. This prevents fabric from touching the grille while keeping the sound clear. The tradeoff is that this method can slightly dampen high frequencies, so balance concealment with audio fidelity.
- Industry-Standard Overcovers and Undercovers: Use sticky pads with fur or fabric to absorb fabric contact and reduce rustle. Brands like Rycote offer disposable solutions that are quick and effective. These covers act as a buffer, reducing the transmission of fabric vibrations, but may slightly alter the proximity effect, so placement adjustments might be necessary.
- Purpose-Built Concealer Clips and Mounts: Use clips like Bubblebee’s or foam mounts that suspend the mic away from fabric. Mount it just inside a shirt collar or in the hair for maximum concealment. These options provide a physical barrier, but they require precise positioning to maintain consistent audio quality, especially when the subject moves.
For example, a wedding videographer tapes the mic with a tape sandwich inside a tuxedo shirt’s button placket — no rustle, no fuss. The key is understanding how each method affects both noise reduction and audio clarity, and choosing the right balance based on the shooting environment.
lav mic clothing noise reduction accessories
As an affiliate, we earn on qualifying purchases.
As an affiliate, we earn on qualifying purchases.
Where to Clip and Conceal Your Lavalier for Best Results
The best placement is about 6–8 inches below the chin, centered on the chest. This spot balances proximity with visibility. When you clip too high, you risk head turns causing uneven audio; too low, and you lose clarity. Proper placement reduces the need for post-production correction and ensures consistent sound quality.
Here’s a quick step-by-step for placement:
- Choose a spot about 20 cm below the chin, centered on the sternum.
- Use a clip or pin that secures the mic snugly but gently — avoid crushing the capsule, as this can affect frequency response and sensitivity.
- Secure the cable with loops inside clothing, running it down the torso to hide and prevent noise. Proper routing prevents bouncing and rubbing, which are common sources of noise and visible clutter.
For example, a documentary filmmaker clips the mic just inside a buttonhole, with the cable routed inside a shirt and secured with tape loops. This placement ensures the mic remains stable during movement, reducing rustle and maintaining clear audio even in active scenes. The implication is that thoughtful placement and routing directly impact the quality and invisibility of your setup.
professional lavalier mic overcovers
As an affiliate, we earn on qualifying purchases.
As an affiliate, we earn on qualifying purchases.
How Fabric Type and Wardrobe Affect Your Microphone Setup
The fabric you wear makes a big difference. Soft matte cotton, knits, and stretchy fabrics are quiet; shiny silk, satin, or athletic nylon tend to be noisy. Jewelry and loose threads can also cause unwanted sounds. Recognizing these differences allows you to tailor your concealment approach effectively.
For example, a speaker in a silk blouse might produce loud rustle every time she moves. The fix? Use foam overcovers, tape the mic with a tape sandwich underneath, or reposition to a less noisy spot like inside a collar or in hair. Understanding the fabric’s acoustic properties helps you decide whether to use physical barriers or adjust placement for optimal sound.
Matching the right concealment method to the wardrobe saves you headaches and reduces the need for extensive post-processing. Think of fabrics like a noise map — the quieter the fabric, the easier it is to hide the mic without fuss. Conversely, noisier fabrics require more careful placement, additional padding, or alternative mounting techniques to maintain audio clarity.
As an affiliate, we earn on qualifying purchases.
Cable Management Tricks to Keep Noise and Visibility Low
Proper cable routing is the secret sauce for quiet, invisible audio. The key? Loops, strain relief, and routing inside clothing. When the cable is loose and bouncing, it creates noise and looks sloppy. The goal is to keep the cable as stable as possible while preventing it from rubbing against fabric or bouncing during movement.
Try this: run the cable inside the shirt or jacket, make small loops at the connector, and secure with medical tape or a strap. Place the transmitter at the waistband or in a pocket, out of sight and out of the way. This minimizes movement-induced noise and keeps the setup tidy.
A wedding videographer secures the cable along the back of a groom’s shirt with tape loops and clips the transmitter discreetly at his belt. This careful routing prevents cable bounce and rustle, ensuring the audio remains clear and unobtrusive. The implication is that strategic cable management is essential for professional, noise-free results.
Pre-Flight Rustle Tests: Why and How to Make Sure Your Setup Works
Before you start filming, always test your setup by mimicking real movements. Sit, stand, turn your head, cross your arms. Listen in headphones for any rustle or noise. This step is crucial because it reveals hidden issues that might not be obvious during static tests.
For example, a corporate presenter does a quick test, crossing arms and leaning forward. When she hears a scratch, she adjusts the cable loop or moves the mic slightly. This pre-flight check allows you to identify and fix potential noise sources before recording, saving time and ensuring professional-quality audio.
Think of it as a dry run for your mic — the more you test, the fewer surprises during the shoot. The tradeoff is that neglecting this step can result in noisy recordings that are difficult or impossible to fix in post-production, especially if the noise is caused by movement or contact during the shoot.
Frequently Asked Questions
How do I hide a lav under a tight shirt without rustle?
Use a tape sandwich or medical tape to create an air gap over the mic and secure it inside the placket or collar. Always loop the cable inside clothing to prevent movement noise.Where’s the best place to clip a lav for minimal noise?
About 6 to 8 inches below the chin, centered on the chest. This position offers good proximity and limits head-turn noise.Why does my lav sound muffled under clothing?
Fabric blocks high frequencies. To fix it, create an air gap, reposition the mic, or apply a gentle high-shelf EQ boost during editing.Can I hide a lav in hair or a wig?
Yes, but secure it tightly with wig tape or small clips. Make sure the mic is sealed against sweat and movement to prevent rustle.How do I prevent cable noise from clothing or movement?
Loop the cable inside clothing, secure it with tape or clips, and route it along seams to keep it from bouncing or rubbing.Conclusion
Hiding a lavalier without creating noise is about understanding how fabric and cable interact with your mic. When you control those contact points, you turn a potentially noisy setup into invisible, crystal-clear audio.
Next time you set up, remember: placement, secure mounting, and a quick test are your best friends. Good audio doesn’t have to be loud — it just has to be quiet and unseen.
Halloween Picks
halloween
As an affiliate, we earn on qualifying purchases.